ในกรณีเปิด sharepoint แล้วขึ้น Cannot start service W3SVC on computer
มีวิธีการแก้ไขดังนี้
start -- run -- cmd
appwiz.cpl -> Turn windows features on or off -> Uncheck Internet Information Services and Windows Process Activation Service
Restart เครื่อง
Run appwiz.cpl again and install both Internet Information Services and Windows Process Activation Service.
เสร็จแล้วเข้าไปที่ Internet Information Services (IIS) Manager
แล้วกด Start ตัวที่ยัง Stop อยู่ดังภาพ
เสร็จแล้ว เปิดเว็บ sharepoint ตามปกติ http://localhost/
วันจันทร์ที่ 20 พฤษภาคม พ.ศ. 2556
การติดตั้ง SharePoint Foundation 2010 บน Windows 7 x64
ก่อนการติดตั้ง SharePoint 2010 Foundation บน Windows 7 แบบ 64Bit ให้ทำการอัพเดตวินโดว์ให้ใหม่ที่สุด จากนั้นให้เตรียมโปรแกรมต่างๆเหล่านี้ให้เรียบร้อย
1. SharePointFoundation.exe
2. SharePointDesigner.exe
3. Microsoft Sync Framework Runtime
4. Microsoft SQL Server 2008 Native Client
5. Windows Identity Foundation
6. Microsoft ADO.NET Data Services Update (KB976127)
7. Chart Controls
8. SQL Server Analysis Services – ADOMD.Net
9. KB976462 For Windows 7
ซึ่งทั้งหมดสามารถโหลดได้จากลิงค์นี้
เนื่องจาก Sharepoint 2010 ไม่ได้ทำให้รองรับ Windows 7 จึงต้องมีการปรับแต่งไฟล์ชื่อว่า config.xml ซึ่งอยู่ในไฟล์ SharePointFoundation.exe ซึ่งมีวิธีการดังต่อไปนี้
1. สร้างโฟลเดอร์ชื่อ sharepoint ใน C:\sharepoint
2. ก๊อปปี้ไฟล์ SharePointFoundation.exe เข้าไป แล้วให้ทำการแตกไฟล์ โดยเปิดโปรแกรม Command Prompt แล้วพิมพ์คำสั่งดังต่อไปนี้ C:\sharepoint>SharePointFoundation.exe /extract:c:\sharepoint
3. จะได้ไฟล์ที่แตกออกมา จากนั้นให้เข้าไปที่ C:\sharepoint\Files\Setup\ แล้วเปิดไฟล์ config ด้วย Notepad
4. ให้พิมพ์ข้อความนี้ลงไป
<Setting Id="AllowWindowsClientInstall" Value="True"/> ก่อนบรรทัดปิด </Configuration> ดังภาพ
เสร็จแล้ว Save แล้วปิดโปรแกรม
5. หลังจากนั้นให้ติดตั้งโปรแกรมต่างๆดังนี้
Microsoft Sync Framework Runtime
Microsoft SQL Server 2008 Native Client
Windows Identity Foundation
Microsoft ADO.NET Data Services Update (KB976127)
Chart Controls
SQL Server Analysis Services – ADOMD.Net
เสร็จแล้ว Restart เครื่อง
6. จากนั้นให้เข้าไปที่ Programs and Features ใน Control Panel คลิกเมนู Turn Windows features On or Off ดังภาพ
7. เมื่อเข้ามาแล้วให้ตั้งค่าที่หัวข้อ Internet Information Service ==> Web Management Tools แล้วติ๊กตั้งค่าดังภาพ
ต่อเนื่อง
8. หลังจากนั้นให้ติดตั้งไฟล์ Windows6.1-KB976462-v2-x64.msu (อาจจะติดตั้งไม่ผ่าน ไม่เป็นไร)
9. เสร็จแล้ว Restart เครื่อง
10. หลังจากบูตเครื่องขึ้นมาให้คลิกไฟล์ Setup ใน C:\sharepoint แล้วก็เริ่มติดตั้ง SharePoint Foundation
ในกรณีติดตั้งเสร็จแล้ว แต่โปรแกรมบอกว่า Failed ( ติดตั้งไม่ผ่าน ) ให้ไปที่ไฟล์ Setup แล้วติดตั้งแบบ Repair
และ SharePoint Designer ตามลำดับ
อ้างอิง
http://boonthaweet.wordpress.com/2010/12/02/วันพุธที่ 15 พฤษภาคม พ.ศ. 2556
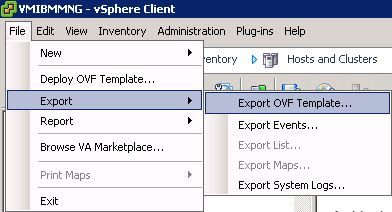
การ Export Guest OS จาก VSphere Client
การ Export Guest OS จาก VSphere
Client
1. คลิก Guest OS ที่ต้องการ
2. ไปที่เมนู File เลือก Export
– Export OVF Template
การ Import ไฟล์กลับเข้ามาใช้งาน
1.
เปิด VSphere Client
2.
เลือกเมนู File – Deploy OVF Template
3.
เลือกไฟล์ที่ต้องการจะ Deploy กลับเข้ามา
4.
ตั้งชื่อที่ต้องการหรือตั้งตามชื่อเดิมก็ได้
5.
เลือก Inventory Location
6.
เลือก Server Vm ที่จะติดตั้ง
7.
โปรแกรมจะแสดงรายละเอียดต่างๆ กด Finish
8.
รอการ Restore กลับเสร็จ
Installing VMware Tools in an Ubuntu virtual machine (1022525)
Ubuntu Server with only a Command Line Interface
- Go to Virtual Machine > Install VMware Tools (or VM > Install VMware Tools).
Note: If you are running the light version of Fusion, or a version of Workstation without VMware Tools, or VMware Player, you are prompted to download the Tools before they can be installed. Click Download Now to begin the download. - In the Ubuntu guest, run these commands:
sudo mkdir /mnt/cdromWhen prompted for a password, enter your Ubuntu admin user password.
Note: For security reasons, the typed password is not displayed. You do not need to enter your password again for the next five minutes.sudo mount /dev/cdrom /mnt/cdrom or sudo mount /dev/sr0 /mnt/cdromThe file name of the VMware Tools bundle varies depending on your version of the VMware product. Run this command to find the exact name:ls /mnt/cdromtar xzvf /mnt/cdrom/VMwareTools-x.x.x-xxxx.tar.gz -C /tmp/
Note:x.x.x-xxxxis the version discovered in the previous step.cd /tmp/vmware-tools-distrib/sudo ./vmware-install.pl -d
Note: The-dswitch assumes that you want to accept the defaults. If you do not use-d, press Return to accept each default or supply your own answers.
- Run this command to reboot the virtual machine after the installation completes:
sudo reboot
อ้างอิง http://kb.vmware.com/selfservice/microsites/search.do?language=en_US&cmd=displayKC&externalId=1022525
วันอังคารที่ 14 พฤษภาคม พ.ศ. 2556
แก้ปัญหา DNS ใน Resolv.conf หาย
#pico /etc/networking/interface
auto eth0
iface eth0 inet static
address 10.10.2.xx
netmask 255.255.255.0
gateway 10.10.2.1
iface eth0 inet static
address 10.10.2.xx
netmask 255.255.255.0
gateway 10.10.2.1
--- เพิ่มส่วนนี้เข้าไป ---
dns-nameservers 202.29.32.1 202.129.27.133
dns-domain yru.ac.th
dns-nameservers 202.29.32.1 202.129.27.133
dns-domain yru.ac.th
เวลา restart ใหม่จะไม่หาย
สมัครสมาชิก:
ความคิดเห็น (Atom)


