แสดงบทความที่มีป้ายกำกับ Esxi แสดงบทความทั้งหมด

วันศุกร์ที่ 6 ธันวาคม พ.ศ. 2562

วิธีแก้ Update ESXi6.5.4564106 to ESXi6.5 Update3 (Build14990892) แล้วขึ้น Error ‘L1 Terminal Fault - VMM’ CVE-2018-3646 (55806)


Enabling the ESXi Side-Channel-Aware Scheduler using the vSphere Web Client or vSphere Client
1. Connect to the vCenter Server using either the vSphere Web or vSphere Client.
2. Select an ESXi host in the inventory.
3. Click the Manage (5.5/6.0) or Configure (6.5/6.7) tab.
4. Click the Settings sub-tab.
5. Under the System heading, click Advanced System Settings.
6. Click in the Filter box and search VMkernel.Boot.hyperthreadingMitigation
7. Select the setting by name and click the Edit pencil icon.
8. Change the configuration option to true (default: false).
9. Click OK.
10. Reboot the ESXi host for the configuration change to go into effect.


Web Reference : https://kb.vmware.com/s/article/55806?fbclid=IwAR2WCb5N--clOhDfca6-WnvQ0pXLllkhhcpJo4MlfudWJ9_IvrvfdSDpoHU

วันเสาร์ที่ 11 พฤษภาคม พ.ศ. 2562

กรณี Update Build Esxi 5.5 แล้วขึ้น esx.problem.hyperthreading.unmitigated

1.หลังจากที่อัพเดต Build ของ Esxi 5.5 แล้วขึ้นดังภาพ

2.ให้เข้าไปที่ แถบ Configuration ที่หัวข้อ Software เข้าไปที่ Advance Settings
3.หาหัวข้อ UserVers และด้านซ้ายหาคำว่า UserVers.SuppressHyperthedinWarning
4.จากนั้นเปลี่ยนค่าจาก 0 ให้เป็น 1 แล้วกด OK

อ้างอิง https://kb.vmware.com/s/article/57374

วันอังคารที่ 10 กรกฎาคม พ.ศ. 2561

วิธีแก้ปัญหา OS Server 2008 R2 ขึ้น “Bootmgr is missing” ใน Virtual machine

ในกรณีที่ขึ้น BOOTMGR is missing ดังภาพ


วิธีการแก้ปัญหาคือ 
1. Boot กับ Windows Server 2008 R2


2. คลิก Repair your Computer


3. ในกรณีที่มีการทำไฟล์ Recovery ให้คลิกที่ไฟล์แล้วกด Next

4. ในกรณีไม่มี ให้คลิกที่ Restore แล้วกด Next
5. เมื่อขึ้นหน้านี้ ให้เลือก Command Prompt

6. เปลี่ยนจาก x: เป็น c: 
7. พิมพ์คำสั่งดังนี้ 

BCDBOOT C:\Windows

BOOTREC /FIXMBR

BOOTREC /FIXBOOT

BOOTREC /REBUILDBCD

BOOTREC /SCANOS

8. เมื่อเสร็จทุกคำสั่งแล้ว พิมพ์ exit ออกมา แล้ว Restart เครื่อง 1 ครั้ง

web reference : http://www.running-system.com/virtual-machine-with-os-server-2008-r2-bootmgr-is-missing-error/


วันพุธที่ 2 พฤษภาคม พ.ศ. 2561

การ Set Port Mirroring ใน VMware Esxi และตั้งค่าใน Cisco Switch

Configuring ESXi
First create a new Standard vSwitch, this is going to be the target for your port mirror.  Make sure that you name it appropriately so that it is easy to assign it to your VMs without confusion.
Make sure that you then assign the NIC that you connected to the port that is being replicated in the Network adapters tab.
Then most importantly make sure that you set the Security settings of both the vSwitch and the port group to Accept promiscuous mode.
Next set the VLAN ID to All.
Then you need to add a NIC to your VM and select the network that you created above.
Switch Configuration
I was using a Cisco SF300 switch so in the GUI this was a simple matter of going to Diagnostics>Port and VLAN Mirroring and choosing my source and destination ports.  Please note that adding the port mirror does not cause any network interruption or downtime on the switch and can be done in working hours safely.
Testing
To test I first installed Wireshark and selected the NIC that I had bound the mirrored port to.
I then started a continuous ping from my desktop to the device connected to the port that I was mirroring from.  I then added a filter to Wireshark using the syntax ip.addr == 10.200.20.40 (this is the IP of the machine I was pinging from).
Once I could see the ICMP packets I knew that everything was working ok and that I had successfully mirrored the port and sent the traffic to the 2nd NIC of my VM in ESXi.
WebSite Reference : http://dailysysadmin.com/KB/Article/965/port-mirroring-cisco-switch-virtual-machine-vmware-esxi-host/

วันอังคารที่ 26 ธันวาคม พ.ศ. 2560

การติดตั้ง VMware Tools ใน Guest Linux-Ubuntu บน Esxi


1.เปิด Guest OS ที่ต้องการขึ้นมา เลือกเมนู VM --> Guest --> Install/Upgrade VMware tools จะขึ้นหน้าต่างแสดงการMountCDROM เลือก YES

2. สร้าง Directory สำหรับ Mount CD
sudo mkdir /mnt/cdrom

3. รัน command สำหรับ mount cd
sudo mount /dev/sr0 /mnt/cdrom
จะขึ้น mount: /dev/sr0 is write-protect, mounting read-only

4. ใช้คำสั่ง ls /mnt/cdrom เพื่อดูไฟล์ข้างใน

5. แตกไฟล์ VMwareTools-x.x.x-xxxx.tar.gz
tar xzvf /mnt/cdrom/VMwareTools-x.x.x-xxxx.tar.gz -C /tmp/

6. เข้าไปในโฟลเดอร์ vmware-tool-distrib
cd /tmp/vmware-tools-distrib/

7. Run ไฟล์สำหรับติดตั้ง vmwaretools
sudo ./vmware-install.pl -d

8. เสร็จแล้ว restart 1 ครั้ง
sudo reboot

web reference : https://kb.vmware.com/s/article/1022525 

วันจันทร์ที่ 23 มกราคม พ.ศ. 2560

การเปิด Direct Console User Interface (DCUI) ด้วย SSH - ESXi


การเปิด Direc Console User Interface (DCUI) ด้วย SSH
1. เลือก Host ที่ต้องการ เข้าที่หัวข้อ Configuration
2. ที่หัวข้อ Software เลือก Security Profile เลือก Properties
3. เปิดใช้งาน SSH , ESXShell , Direct Console UI


4. จากนั้นเข้าหัวโปรแกรม Putty และ Login เข้า Host ทีต้องการ
5. พิมพ์ dcui
6. จะขึ้นหน้า DCUI เหมือนอยู่หน้า Server โดยตรง


หลังจากใช้งานเสร็จ ให้เข้าไปยกเลิกการเปิดใช้งาน SSH , ESXShell , Direct Console UI ด้วยเพื่อความปลอดภัย

วันจันทร์ที่ 18 เมษายน พ.ศ. 2559

วิธีการอัพเดต Patch ของ VMware Esxi

1.ไฟล์ Patch สามารถโหลดได้จากเว็บนี้  Product Patches โดยเลือกเวอร์ชั่นของ Esxi ที่ใช้งานอยู่ 
2. ติ๊กเลือกไฟล์ Patch ที่ต้องการอัพเดต แล้วกด Download หลังจากดาวน์โหลดแล้ว ให้ก๊อปปี้ไฟล์ .zip ไปยัง Datastore ของ host ไว้

3. การเข้าไปอัพเดต Patch ต้องเข้าผ่าน ssh ใน Esxi Host โดยต้องเข้าไป Enable SSH ก่อน มีวิธีการดังนี้
3.1 เลือกโฮสต์ (IP Host) --> คลิกที่แถบ Configuration --> ที่หัวข้อ Software เลือก Security Profile --> ที่หัวข้อ Services เลือก Properties


3.2 เมื่อเข้าหน้า Service Properties หาคำว่า SSH  จะเห็นสถานะว่า Stopped อยู่ ให้คลิกปุ่ม Options --> เลือกหัวข้อ Start and stop manually แล้วคลิกปุ่ม Start แล้วกด OK


4. หลังจากนั้นเข้าโปรแกรม putty หรือ ssh อื่นๆ โดยใช้ User & Password Root
5. รูปแบบของคำสั่งเป็นดังนี้ : 
Example : esxcli software vib install -d /vmfs/volumes/datastore1/FilePatch.zip
Use : esxcli software vib install -d /vmfs/volumes/VM212/ESXi550-201602001.zip


6. เมื่อพิมพ์ข้อความเสร็จแล้วกด Enter แล้วรอจนกว่าจะดำเนินการเสร็จ

7. เมื่อขึ้นดังภาพ พิมพ์ reboot เพื่อ restart Vmware Esxi 1 ครั้ง
8. ดูความแตกต่างจากเวอร์ชั้นเดิม โดย Build Number จะเปลียนไป

ข้อควรระวัง : ในกรณีที่มีการใช้งาน vCenter ด้วย จะต้องอัพเดต Build ของ vCenter ให้สูงกว่า Patch ของ Host ที่จะอัพเดต มิเช่นนั้น อาจจะทำให้ Host หลุดออกจาก vCenter และไม่สามารถที่จะ Add เข้าไปใหม่ได้

reference site : http://www.vladan.fr/how-to-install-latest-esxi-vmware-patch/


วันพฤหัสบดีที่ 24 ธันวาคม พ.ศ. 2558

แก้ปัญหา IPMI System Event.log และ Reset Sensor ใน Exsi 5.5

1. เปิด vCenter Server โดยใช้ vSphere Client.
2. เลือก Host ที่ขึ้น Alarm Event.log
3. คลิกที่แถบ Hardware Status.
4. ในช่อง View เลือก System Event log
5. คลิก Reset Event Log. แล้วรอจนกว่าจะทำงานเสร็จ
6. คลิก Reset Sensors เพื่อรีเซ็ตค่าเซ็นเซอร์ใหม่

วันอาทิตย์ที่ 31 มีนาคม พ.ศ. 2556

การติดตั้ง VMware EXSi 5.1 บนเครื่อง Server

1.ดาวน์โหลดโปรแกรมจากเว็บไซต์ https://my.vmware.com/web/vmware/details?productId=285&downloadGroup=VCL-VSP510-ESXI-510-EN
2.หลังจากจากดาวน์โหลดเสร็จแล้ว  ทำการไรท์ลงแผ่นซีดีให้เรียบร้อย
3.ใส่แผ่นพร้อมตั้งค่าบูตแผ่นซีดีที่เครื่อง Server
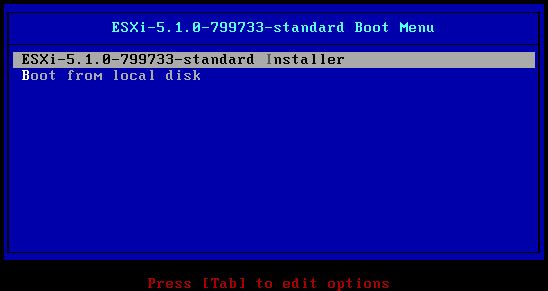
4.จะขึ้นหน้าจอ ESXi Boot Menu – เลือกข้อแรก สำหรับการติดตั้ง EXSi

5.โปรแกรมจะแสดงรายละเอียดของเวอร์ชั่นของโปรแกรม รายละเอียดของเครื่องแม่ข่ายที่จะติดตั้ง พร้อมโหลดค่าโมดูลต่างๆที่จะต้องใช้ในการติดตั้ง

6.เข้าสู่หน้าจอต้อนรับสู่การติดตั้ง VMware ESXi  เลือก (Enter) Continue

7.แสดงรายละเอียดข้อตกลงต่างๆของโปรแกรม เลือก (F11) Accept and continue

8.เลือกฮาร์ดดิสที่จะใช้ในการติดตั้ง โดยโปรแกรมจะแสดงชื่อและขนาดของฮาร์ดดิสก์ เลือก (Enter) Continue

9.เลือกรูปแบบของ Keyboard ที่จะใช้งาน เลือก (Enter) Continue

10.กำหนดรหัสผ่านของ Root เสร็จแล้ว เลือก (Enter) Continue

11.โปรแกรมเริ่มทำการสแกนไฟล์ระบบที่จะใช้ในการติดตั้ง ใช้เวลาสักครู่

12.หลังจากนั้นโปรแกรมจะขึ้นหน้าต่างยืนยันการติดตั้ง หากต้องการติดตั้งจริงให้ เลือก (F11) install

13.เริ่มการติดตั้ง ใช้เวลาพอประมาณ และหลังจากติดตั้งเสร็จแล้ว จะขึ้นหน้าให้ Restart ระบบ 1 ครั้ง เลือก (Enter) Reboot

 เครื่องแม่ข่ายเริ่ม  Reboot

14.หลังจากรีสตาร์ทแล้ว โปรแกรมจะแสดงรายละเอียดของระบบพร้อมทั้งลิงค์ URL ที่ใช้ดาวน์โหลดโปรแกรม VSphere Client 

15.หากผู้ใช้งานต้องการที่จะเข้าไปตั้งค่าไอพีใหม่  หรือตั้งค่าอื่นๆ โปรแกรมจะแสดงฟังค์ชั่นที่ใช้ในการตั้งค่าดังภาพ
 สามารถกดปุ่ม (F2) Customize System ได้

16.โปรแกรมจะแสดงช่องใส่รหัสผ่านที่ได้กำหนดไว้ตอนต้นของการติดตั้ง โดย Default ของ User คือ root
ใส่รหัสผ่านเรียบร้อยแล้ว เลือก <Enter> OK

17.แสดงหน้าการตั้งค่าแต่ละประเภท ผู้ใช้งานสามารถเลือการตั้งค่าต่างๆได้ตามต้องการ

18.หลังจากตั้งค่าเรียบร้อยแล้ว ให้ไปยังเครื่อง PC สำหรับใช้ในการติดตั้งโปรแกรม VSphere 
เปิด Browser แล้วพิมพ์ URL ของเครื่องแม่ข่ายที่ได้ตั้งค่าไว้  แล้วจะขึ้นหน้าต่างดังภาพ
คลิก Download vSphere client และติดตั้งลงเครื่องให้เรียบร้อย


19.หลังจากติดตั้งแล้ว จะขึ้นหน้าดังภาพ เพื่อเข้าใช้ในการสร้าง Guest OS ต่อไป

20.แสดงหน้าต่างของโปรแกรม EXSi ผ่าน vSphere Client