วันอังคารที่ 26 ธันวาคม พ.ศ. 2560

การติดตั้ง VMware Tools ใน Guest Linux-Ubuntu บน Esxi


1.เปิด Guest OS ที่ต้องการขึ้นมา เลือกเมนู VM --> Guest --> Install/Upgrade VMware tools จะขึ้นหน้าต่างแสดงการMountCDROM เลือก YES

2. สร้าง Directory สำหรับ Mount CD
sudo mkdir /mnt/cdrom

3. รัน command สำหรับ mount cd
sudo mount /dev/sr0 /mnt/cdrom
จะขึ้น mount: /dev/sr0 is write-protect, mounting read-only

4. ใช้คำสั่ง ls /mnt/cdrom เพื่อดูไฟล์ข้างใน

5. แตกไฟล์ VMwareTools-x.x.x-xxxx.tar.gz
tar xzvf /mnt/cdrom/VMwareTools-x.x.x-xxxx.tar.gz -C /tmp/

6. เข้าไปในโฟลเดอร์ vmware-tool-distrib
cd /tmp/vmware-tools-distrib/

7. Run ไฟล์สำหรับติดตั้ง vmwaretools
sudo ./vmware-install.pl -d

8. เสร็จแล้ว restart 1 ครั้ง
sudo reboot

web reference : https://kb.vmware.com/s/article/1022525 

วันอังคารที่ 12 ธันวาคม พ.ศ. 2560

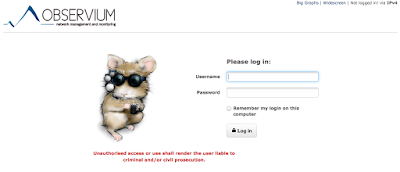
การติดตั้งโปรแกรม Monitoring Observium บน Ubuntu 16.04


0. ติดตั้ง Ubuntu 16.04 Server + Update และ Upgrade ให้เรียบร้อย

1. apt-get install libapache2-mod-php7.0 php7.0-cli php7.0-mysql php7.0-mysqli php7.0-gd php7.0-mcrypt php7.0-json php-pear snmp fping mysql-server mysql-client python-mysqldb rrdtool subversion whois mtr-tiny ipmitool graphviz imagemagick apache2 snmp snmpd -y


2. mkdir -p /opt/observium && cd /opt


3. wget http://www.observium.org/observium-community-latest.tar.gz && tar zxvf observium-community-latest.tar.gz


4. cd observium && cp config.php.default config.php


5. แก้ไขไฟล์ config.php และตั้งค่า the MySQL username and password, most other settings can be left as default.


6. mysql -u root -p <mysql root password>


   mysql> CREATE DATABASE observium DEFAULT CHARACTER SET utf8 COLLATE utf8_general_ci;
   mysql> GRANT ALL PRIVILEGES ON observium.* TO 'observium'@'localhost' IDENTIFIED BY 'sup3rs3cr3t';
   mysql> FLUSH PRIVILEGES;
   mysql> quit;
       
7. /opt/observium/discovery.php -u


8. mkdir /opt/observium/logs && mkdir /opt/observium/rrd && chown www-data:www-data /opt/observium/rrd


9. ls -lt /opt/observium/rrd


10. vi /etc/apache2/sites-available/000-default.conf


   <VirtualHost *:80>
             ServerAdmin webmaster@localhost
             DocumentRoot /opt/observium/html
             <FilesMatch \.php$>
             SetHandler application/x-httpd-php
             </FilesMatch>
             <Directory />
         Options FollowSymLinks
         AllowOverride None
             </Directory>
             <Directory /opt/observium/html/>
                          DirectoryIndex index.php
                          Options Indexes FollowSymLinks MultiViews
                          AllowOverride All
                          Require all granted
             </Directory>
             ErrorLog  ${APACHE_LOG_DIR}/error.log
             LogLevel warn
             CustomLog  ${APACHE_LOG_DIR}/access.log combined
             ServerSignature On
   </VirtualHost>
       
11. phpenmod mcrypt
    a2dismod mpm_event
    a2enmod mpm_prefork
    a2enmod php7.0
    a2enmod rewrite
    apache2ctl restart
       
12. ตั้ง user และ รหัสผ่านที่จะใช้ในการ Login ผ่านหน้าเว็บ
/opt/observium/adduser.php administrator mys3cr3tpwd 10
                                 (username)      (passwd)   (level)


13. Create a new file: touch /etc/cron.d/observium
   ;then add the following contents...
       
   # Run a complete discovery of all devices once every 6 hours
   33  */6   * * *   root    /opt/observium/discovery.php -h all >> /dev/null 2>&1


   # Run automated discovery of newly added devices every 5 minutes
   */5 *     * * *   root    /opt/observium/discovery.php -h new >> /dev/null 2>&1


   # Run multithreaded poller wrapper every 5 minutes
   */5 *     * * *   root    /opt/observium/poller-wrapper.py 4 >> /dev/null 2>&1


   # Run housekeeping script daily for syslog, eventlog and alert log
   13 5 * * * root /opt/observium/housekeeping.php -ysel >> /dev/null 2>&1


   # Run housekeeping script daily for rrds, ports, orphaned entries in the database and performance data
   47 4 * * * root /opt/observium/housekeeping.php -yrptb >> /dev/null 2>&1


14. vi /etc/snmp/snmp.conf
       ;remove...
       mibs :
       ;replace with...
       mibdirs /opt/observium/mibs:/opt/observium/mibs/net-snmp


15. vi /etc/snmp/snmpd.conf   //delete the contents and add the following...


       agentAddress  udp:161
       rocommunity 0bs3rv1um  localhost
       sysLocation    My Data Center
       sysContact     Admin <admin@example.org>
       sysServices    72
       proc  mountd
       disk       /     10000
       disk       /var  5%
       includeAllDisks  10%
       load   12 10 5
       trapsink  localhost 0bs3rv1um
       master          agentx
       extend .1.3.6.1.4.1.2021.7890.1 distro /usr/bin/distro


   //dont forget to restart snmpd service.... “systemctl restart snmpd”


16. Configure SNMP on at least one device that you wish to monitor before continuing...
        
       //testing command: snmpwalk -v2c -c 0bs3rv1um localhost


17. /opt/observium/add_device.php <hostname> <community> v2c

18. /opt/observium/discovery.php -h all

19. /opt/observium/poller.php -h all

20. reboot

ปล. ในขั้นตอนที่ 17 หากมีการเพิ่มเครื่องหลายเครื่อง ให้ทำซ้ำๆ ให้เสร็จก่อน แล้วค่อยทำข้อ 18 - 20 ในครั้งเดียว

web reference : https://www.youtube.com/watch?v=5PO3Z-pfy0g

วันพุธที่ 23 สิงหาคม พ.ศ. 2560

การติดตั้ง Open fire


1. เตรียม server ให้พร้อม จากนั้นติดตั้ง Java ดังนี้
sudo add-apt-repository ppa:webupd8team/java
sudo apt-get update
sudo apt-get install oracle-java7-installer

2. ดาวโหลดไฟล์ Openfire จากเว็บโดยตรง http://download.openpkg.org/components/cache/openfire/
หรือจากเว็บที่เตรียมไว้แล้ว wget http://10.10.2.108/software/openfire_4_0_3.tar.gz

3. แตกไฟล์ tar -xvzf openfire_4_0_3.tar.gz
4. ก๊อปปี้ไฟล์ไปวางที่ /opt
sudo mv openfire /opt

5. เข้าไปแก้ไขไฟล์ openfire.xml โดยเข้าไปดังนี้
pico /opt/openfire/conf/openfire.xml
ที่บรรทัด 127.0.0.1 ให้ใส่ IP Address ของเครื่อง Server ที่ใช้งานอยู่
<network>
 <interface>127.0.0.1</interface>
 </network>
เสร็จแล้วกด ctrl+x เพื่อ save และออกจาก pico

6. ใช้คำสั่งให้ openfire ทำงาน ดังนี้
/opt/openfire/bin/openfire start

คำสั่งหยุดทำงาน /opt/openfire/bin/openfire stop

7. เข้าไปจัดการที่หน้าเว็บด้วย http://<ipaddress>:9090

** ในกรณีที่มีการติดตั้งผิดพลาดสามารถเข้าไปเริ่มใหม่โดยต้องเข้าไปแก้ไขไฟล์ openfire.xml ดังนี้
pico /opt/openfire/conf/openfire.xml หาบรรทัด <setup>true</setup>  จากนั้นแก้ค่าจาก true เป็น false แล้ว save จากนั้น ให้ Refresh หน้าเว็บใหม่ จะขึ้นหน้าให้ทำการ setup ใหม่ทั้งหมด

8. ในการ ใช้งานโปรแกรม Spark หากตอน login ขึ้นหน้าต่างว่า Certificate hostname verification failed
ให้กดเข้าไปที่ Advanced ที่แถบ General ให้ติ๊กถูกหน้าข้อ Disable certificate hostname verification เสร็จแล้วกด OK

เว็บอ้างอิง
https://community.spiceworks.com/topic/1723660-how-to-install-openfire-on-ubuntu-server-16-0-4
https://www.unixmen.com/install-openfire-ubuntu-12-04-lts/
https://community.igniterealtime.org/thread/34754
https://community.igniterealtime.org/thread/59573

วันอังคารที่ 13 มิถุนายน พ.ศ. 2560

ใช้โปรแกรม Teamviewer แล้วหลุดบ่อย

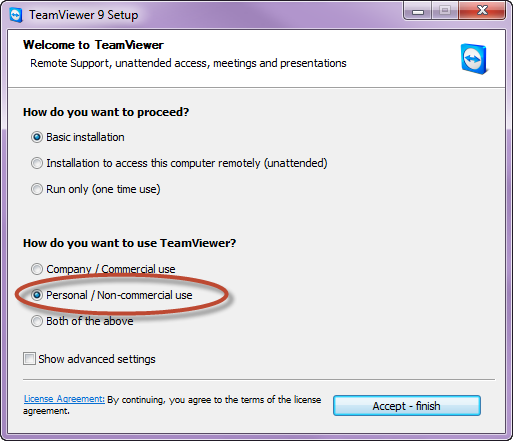
ถ้าพูดถึงโปรแกรมที่ใช้ในการ Remote แล้วนั้นหลายคนคงจะรู้จักกับโปรแกรมยอดฮิตอย่าง Teamviewer หลาย ๆ คน อาจจะเคยเจอกับปัญหาสามารถใช้งานได้เพียง 5 นาทีแล้วหลุด จะใช้ต่อต้องรอนาน บางครั้งอาจถึง 10 นาที เพื่อใช้งานต่อได้อีก แค่ 5 นาที ตามรูป

พยายาม uninstall ก็แล้ว ทำไมยังไม่หายสักที สาเหตุที่ uninstall แล้วไม่หายนั้น เกิดจาก uninstall แล้วข้อมูลที่เกี่ยวกับการตั้งค่าหรือการใช้งานนั้นยังคงอยู่ในเครื่องของเรา สามารถแก้โดยเอาออกให้สิ้น
ขั้นตอนการ ลบ  teamviewer 
    1. remove programs  teamviewer ตามปกติ (controlpanel -> add or remove programs)
    2. ลบโฟลเดอร์ teamviewer ใน C:\User\UserName\AppData\Roaming
    3. เข้าไปที่ regedit โดยไปที่ Start - > run จากนั้นพิม regedit ลบโฟลเดอร์ Teamviewer ที่ 
        HKEY_CURRENT_USER > Software และ HKEY_LOCAL_MACHINE > Software โดยการคลิกขวาเลือก Delete
    4. เปลี่ยน MAC Address ของ Ethernet หรือ แลนนั่นเอง วิธีการเปลี่ยนก็มีหลากหลายวิธี อาจจะใช้โปรแกรมช่วยอย่างเช่นโปรแกรม Mac Makeup  หรือจะเปลี่ยนเอง ในที่นี้ ผมขอแสดงขั้นตอนในการเปลี่ยน MAC โดยไม่ใช้โปรแกรมช่วยนะครับ ก่อนที่จะเปลี่ยน MAC address เรามาตรวจสอบ MAC ของเราก่อน ทำได้โดยการพิมคำสั่ง ipconfig /all ใน cmd ดูค่าของ Physical Address นั่นคือ MAC ของเรานั่นเอง หลังที่รู้ MAC ของเราแล้วนั้นก็ไปเปลี่ยนกันเลย
        ขั้นตอนแรก ให้เข้าไปที่ Control Panel > Network and Internet >Network Connections สามารถเข้าโดยการ คลิกขวาที่ รูป จอคอมหรือรูปไวไฟ เลือก Open Network and Sharing Center
   จากนั้นเลือกไปที่ Change Adapter Settings คลิกขวาที่ Local Area Connection เลือก properties
คลิกที่ configure ตามรูป
เลือกไปที่ tab Advanced คลิกที่ Network Address เลือก Value จากนั้น นำ MAC เดิมที่เช็คก่อนหน้านี้มาใส่แล้วทำการเปลี่ยนค่าของ 2 ตัวท้าย กด OK เป็นการเสร็จสิ้น


หลังจากที่ทำการลบโปรแกรม teamviewer ในเครื่องแล้ว เปลี่ยนค่า MAC เรียบร้อยก้สามารถติดตั้งโปรแกรม Teamviewer ได้ใหม่ โดยในการติดตั้งนั้นให้เราเลือก personal/non-commercial use 

แค่นี้ก็สามารถใช้งาน Teamviewer ได้โดยไม่หลุดบ่อยแล้ว


http://ripberk.blogspot.com/2014/08/teamviewer.html 

วันศุกร์ที่ 9 มิถุนายน พ.ศ. 2560

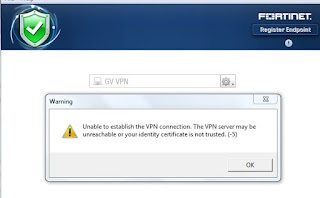
ไม่สามารถเข้าใช้งาน Foticlient VPN สำหรับ Windows 7

แสดงรูปปัญหาที่ไม่สามารถเชื่อมต่อ VPN ได้ ในกรณีใช้ Windows 7


วิธีแก้ไขดังนี้
เข้าไปที่ Internet Explorer  คลิกเมนู Tools --> Internet Options --> advanced  เลือนมาที่หัวข้อ Security เลือกติ๊กที่ 
- Use SSL 3.0
- Use TLS 1.0
- Use TLS 1.1
- Use TLS 1.2
เสร็จแล้วกด OK

เสร็จแล้วให้ลอง Conncet ดูอีกครั้ง จะสามารถเข้าใช้งานได้

- หากยังไม่สามารถเข้าใช้งานได้ ให้ติดตั้งไฟล์ Microsoft Security Advisory 3033929 โดยเข้าไปโหลดได้ที่เว็บ https://technet.microsoft.com/en-us/library/security/3033929 โดยเลือกระบบปฏิบัติการ Windows 7 และเลือกว่าใช้แบบ 32bit หรือ 64bit

- หากในระหว่างการติดตั้งแล้วขึ้นกล่องข้อความว่า "The digital signature on the installer package is invalid. Installation aborted." ให้เข้าไปที่ internet explore เข้าเมนู option เลือกแถบ Advance แล้วเลื่อนมาที่หัวข้อ security แล้วติ๊กหัวข้อ “Allow software to run or install even if the signature is invalid.” และให้เข้า cmd ด้วยสิทธ์ Administrator แล้วพิมพ์ bcdedit /set nointegritychecks ON

วันพุธที่ 31 พฤษภาคม พ.ศ. 2560

อนุญาตให้ User สามารถ Sudo เข้าสิทธ์ root ได้ใน Ubuntu

#sudo adduser sulkiflee sudo
#sudo adduser sulkiflee root

การเช็คเวอร์ชั่น Ubuntu

Check Release Update Ubuntu
https://wiki.ubuntu.com/Releases

#do-release-upgrade  upgrade version

การตั้งเวลาใน Ubuntu

Set Timezone
#sudo timedatectl set-timezone UTC

Set DateTime
sudo date --set "25 Sep 2013 15:00:00"

วันพฤหัสบดีที่ 30 มีนาคม พ.ศ. 2560

การขยายพื้นที่ฮาร์ดดิสก์ Server Ubuntu ใน VM Esxi

ในการขยายพื้นที่ใน VMware Esxi  สามารถทำได้ 2 แบบ คือการ Add Harddisk เพิ่มเข้าไปอีก 1 ตัว และอีกวิธีนึงคือการขยายจากเนื้อที่เดิมที่มีอยู่ให้มากขึ้น ซึ่งในแบบที่จะทำคือการขยายพื้นที่เดิม เช่นจาก 30 GB เป็น 80 GB  ในตัวอย่างจะสาธิตการขยายเนื้อที่จาก 5.70 GB เป็น 8.69 GB

xpanding a Linux disk with gparted (and getting swap out of the way)

Over the past year or so there have been a few times where I've need to expand a disk attached to a Debian system.  Now this isn't a hard task by any means, and may not even warrant a blog post, but the matter of it is that I always seem to forget the steps I need to take to get that unallocated space that I've added next to my actual EXT3 partition since the swap partition is always in the way!  So, I thought I would just throw up how I've done it in the past in hopes to maybe help a few others that visit, but more-so for myself and my memory (or lack there of).  Now keep in mind I'm sure there are ways to perform this exact same thing without taking the VM online, or I'm sure there are other 'better' ways to achieve the same results, but this way has worked for me consistently so it's what I chose to do.  Any other suggestions are certainly welcome in the comment box below.
First off, you will need to expand your drive from within the vSphere Client, not rocket science here, pretty simple to do.  Next, get yourself a copy of gparted and mount the ISO to your VM and reboot booting into the gparted interface (accept all defaults for keymap, X, and resolutions, unless of course you like playing…).  So the first thing you will notice inside gparted is that the swap partition is right smack in the middle of your EXT3 partition and the unallocated space. Normally, you could just resize the EXT3 partition and consume the unallocated space, but with swap there you can't.

So, the goal is to migrate the unallocated space to precede the swap partition.  This is done so using the following procedure..
First, resize your extended partition (not the one labeled linux-swap) to include the free space.  In my case this is done by selecting /dev/sda2 and then selecting the Resize/Move button.  In the popup, simply drag the arrow on the right side of the bar to include all of the free space available and again select Resize/Move.


Just to note, we are not actually performing and moves or resizes at this point, we are simply just creating a chain of commands that gparted will follow once it is applied.  You can either apply at the end of each step, or wait till the bitter end and do it, its up to you.  Either way when you are done, you should see your unallocated space move into /dev/sda2 as shown below.

So, as you can see from the screen capture, the next thing we need to do is move that swap partition to the end of /dev/sda2.  This will allow us to proceed with the next few steps that we need to perform in order to accomplish our end goal of expanding /dev/sda1.  This time we will need to select the linux-swap partition (/dev/sda5) and select Resize/Move.  Inside the popup, this time click the actual white space inside the partition and drag the complete box over to the right (don't use the arrows).  This will move the swap partition to the end of /dev/sda2 for us which we will next resize.  Once your looking like the below images, again, click 'Resize/Move'.
 

Alright, now we are getting somewhere, you should be looking pretty similar to the shot below by now.  And yes you guessed it, now we need to move that unallocated space right outside of /dev/sda2 in order to make it available for the expansion of /dev/sda1.

So, once again select /dev/sda2 and select 'Resize/Move'.  This time we will use the arrows.  What we want is to move the left arrow this time to the right all the way over to edge of the yellow box (swap).  This will resize the complete /dev/sda2 to the same size as the swap it contains (/dev/sda5) and in turn, create that unallocated space in between the partitions.  Once done, click 'Resize/Move'.


Alright, almost there, you should be somewhat similar to the screenshot below.  Our unallocated space is now directly next to our EXT3 partition and no long a member of /dev/sda2.


At this point I usually apply the first three operations before the expansion.  I've noticed sometimes the process will error out if trying to do the following steps without applying first, so go ahead and apply those operations (Hit 'Apply')
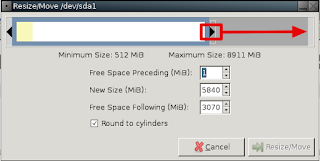
So we are now able to simply extend /dev/sda1 into that unallocated space.  Similar to when we extended /dev/sda2, this time select /dev/sda1, click 'Resize/Move'.  In the popup as we did earlier, select the arrow at the right side of the partition, and drag it to the right to merge sda1 with the unallocated space, when done, select 'Resize/Move'.
  

So, there you have it!  We have moved that unallocated space into our EXT3 partition.  Go ahead and hit apply again to commit that final change and at the end of the process you should have a larger /dev/sda1.

Now, like I said at the beginning, I'm sure there are ways to do this while the VM is online, or I could be doing things completely wrong, but this way has consistently worked for me for both Linux and Windows guests.  That being said, I'm open to other suggestions, leave them your comments, concerns, thoughts, etc below in the comments … 🙂

Web Reference : http://blog.mwpreston.net/2012/06/22/expanding-a-linux-disk-with-gparted-and-getting-swap-out-of-the-way/

วันพฤหัสบดีที่ 16 กุมภาพันธ์ พ.ศ. 2560

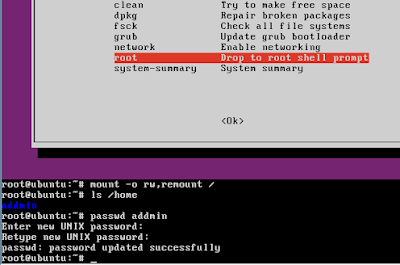
วิธีการ Reset password in Ubuntu

1. ที่หน้า GNU Grub เลือก Advanced Option for Ubuntu
2. เลือก Ubuntu, with Linux (recovery mode)
3.ที่หน้า Recovery Menu เลือก root กด Ok จะขึ้น command line
4.พิมพ์
#mount -o rw,remount /
#ls /home --> ดู user ที่ต้องการ reset password
5.พิมพ์  #passwd <username>
6.Enter new Unix password : ใส่รหัสผ่านใหม่ที่ต้องการ


7. เสร็จแล้วกด Exit
8.เลือก resume เข้าหน้า reboot ปกติ


วันจันทร์ที่ 23 มกราคม พ.ศ. 2560

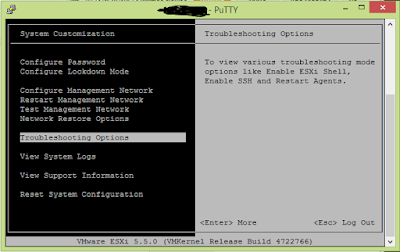
การเปิด Direct Console User Interface (DCUI) ด้วย SSH - ESXi


การเปิด Direc Console User Interface (DCUI) ด้วย SSH
1. เลือก Host ที่ต้องการ เข้าที่หัวข้อ Configuration
2. ที่หัวข้อ Software เลือก Security Profile เลือก Properties
3. เปิดใช้งาน SSH , ESXShell , Direct Console UI


4. จากนั้นเข้าหัวโปรแกรม Putty และ Login เข้า Host ทีต้องการ
5. พิมพ์ dcui
6. จะขึ้นหน้า DCUI เหมือนอยู่หน้า Server โดยตรง


หลังจากใช้งานเสร็จ ให้เข้าไปยกเลิกการเปิดใช้งาน SSH , ESXShell , Direct Console UI ด้วยเพื่อความปลอดภัย