วันเสาร์ที่ 11 พฤษภาคม พ.ศ. 2562

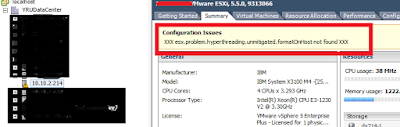
กรณี Update Build Esxi 5.5 แล้วขึ้น esx.problem.hyperthreading.unmitigated

1.หลังจากที่อัพเดต Build ของ Esxi 5.5 แล้วขึ้นดังภาพ

2.ให้เข้าไปที่ แถบ Configuration ที่หัวข้อ Software เข้าไปที่ Advance Settings
3.หาหัวข้อ UserVers และด้านซ้ายหาคำว่า UserVers.SuppressHyperthedinWarning
4.จากนั้นเปลี่ยนค่าจาก 0 ให้เป็น 1 แล้วกด OK

อ้างอิง https://kb.vmware.com/s/article/57374

วันพุธที่ 1 พฤษภาคม พ.ศ. 2562

การ Upgrade Cacti 0.8.8 เป็น Version 1.2.3 ใน Ubuntu 16.04


ลิงค์การติดตั้ง Cacti https://sulkiflee-n.blogspot.com/2019/05/cacti-monitoring-ubuntu-1604.html

1.Install needed package
#apt-get install php-ldap php-gd
Backup Database
#mysqldump -l -ucacti -pPassword –add-drop-table cacti > mysql.cacti

2.Download and Prepare Cacti Installation# wget https://www.cacti.net/downloads/cacti-latest.tar.gz# tar xfz cacti-latest.tar.gz 
3.Backup the Old Cacti#mv /usr/share/cacti/site /usr/share/cacti/site_old
4.Replace with the New Cacti
#mv cacti-1.2.3 /usr/share/cacti/site
5.Copy Needed Scripts, Resource, and Graphs
#cp -u -R /usr/share/cacti/site_old/scripts/* /usr/share/cacti/site/scripts
#cp -u -R /usr/share/cacti/site_old/resource/* /usr/share/cacti/site/resource/
#cp /var/lib/cacti/rra/* /usr/share/cacti/site/rra/ #Doesn’t work
#chmod 777 rra/*
#mv /usr/share/cacti/site/rra /usr/share/cacti/site/rra_old
#ln -s /var/lib/cacti/rra /usr/share/cacti/site/rra

6.Modify the Cacti Configuration File to Connect Database#nano /usr/share/cacti/site/include/config.php
$database_type = ‘mysql’;
$database_default = ‘cacti’;
$database_hostname = ‘localhost’;
$database_username = ‘cacti’;
$database_password = ‘Password’;
$database_port = ‘3306’;
$database_ssl = false;

7.Create TimeZone Table in Database
#mysql_tzinfo_to_sql /usr/share/zoneinfo | mysql -uroot -pPassword mysql
Modify the TimeZone configuration for Apache
#nano /etc/php/7.0/apache2/php.ini
[Date]
; Defines the default timezone used by the date functions
; http://php.net/date.timezone
date.timezone = “Asia/Bangkok”
แก้ timezone#pico /etc/php/7.0/cli/php.ini"Asia/Bangkok"

8.Restart Apache Service
#systemctl start apache2.service
#Visit the Web Page to Finish the Upgrade
แก้ในขั้นตอนการอัพเกรด
innodb_flush_log_at_timeout =3
innodb_read_io_threads =32
innodb_write_io_threads =16
innodb_buffer_pool_instances =9
innodb_io_capacity 200 =5000
innodb_io_capacity_max =10000

เว็บอ้างอิง https://www.chenyiting.com/2018/04/04/upgrade-cacti-0-8-8-to-1-1-37/

การติดตั้ง Cacti Monitoring ใน Ubuntu 16.04


1. ติดตั้ง Ubuntu Server 16.04
2. หลังจากติดตั้งแล้ว อัพเดตระบบอีกครั้งด้วยคำสั่ง
# apt-get update
# apt-get upgrade

3. ติดตั้ง apache2
#sudo apt-get install apache2
#sudo systemctl status apache2.service
#sudo netstat -tlpn
#sudo a2enmod ssl
#service apache2 restart
#sudo a2ensite default-ssl.conf
#service apache2 reload
#sudo systemctl restart apache2.service
#sudo netstat -tlpn
เรียกใช้งาน apache2 https://10.10.2.229/

4. ติดตั้ง php7
#apt install php7.0-snmp php7.0-xml php7.0-mbstring php7.0-json php7.0-gd php7.0-gmp php7.0-zip php7.0-ldap php7.0-mcrypt
#sudo apt install php7.0 libapache2-mod-php7.0 php7.0-mysql php7.0-xml php7.0-gd

ทดสอบสร้างไฟล์ใน info.php
#sudo nano /var/www/html/info.php
<?php
phpinfo();
?>
เรียกใช้งาน https://your_server_IP_address/info.php

5. ติดตั้ง MySQL
Step 1 – Configure Apt Repository
#add-apt-repository 'deb http://archive.ubuntu.com/ubuntu trusty universe'
#apt-get update
#wget http://repo.mysql.com/mysql-apt-config_0.8.9-1_all.deb
#sudo dpkg -i mysql-apt-config_0.8.9-1_all.deb

Step 2 – Install MySQL Server
#sudo apt-get update
#sudo apt-get install mysql-server
# apt-get install apache2 mysql-server-5.6 php libapache2-mod-php

Step 3 – Secure MySQL Installation
#sudo mysql_secure_installation
#sudo systemctl restart mysql.service

#mysql -u root -p

6. ติดตั้ง phpMyAdmin
#sudo apt install php-gettext phpmyadmin
เรียกใช้งาน https://your_server_IP_address/phpmyadmin/

7. ติดตั้ง SNMP, SNPMD และ RRDTools
# apt-get install snmp snmpd rrdtool

8. การติดตั้ง Cacti
# apt-get install cacti cacti-spine
ทำตามขั้นตอน
- เลือก server เป็น apache2
- เลือก config database Yes
- ใส่รหัสผ่าน MySQL
- ตั้งชื่อ Database for Cacti ว่า cacti

# service snmpd restart
# service mysql restart
# service apache2 restart

9. เข้าเว็บหน้า config cacti  http://your-server_ip-address/cacti
Default user & password คือ admin

เว็บอ้างอิง https://linoxide.com/ubuntu-how-to/install-setup-cacti-ubuntu-16-04/
วันอังคารที่ 11 ธันวาคม พ.ศ. 2561

การ Upgrade โปรแกรม Monitoring Observium บน Ubuntu 16.04


Community Edition
Upgrade to latest Major release

0.Disable observium cronjobs [optional]

1.Run the following commands (as root):

#cd /opt
#mv observium observium_old
#wget -Oobservium-community-latest.tar.gz http://www.observium.org/observium-community-latest.tar.gz
#tar zxvf observium-community-latest.tar.gz
#mv /opt/observium_old/rrd observium/
#mv /opt/observium_old/logs observium/
#mv /opt/observium_old/config.php observium/

2.Update DB schema:
#/opt/observium/discovery.php -u

3.If it has been a very long time since you've updated (12 months or more), you may want to force an immediate rediscovery of all devices to make sure things are up to date :
#/opt/observium/discovery.php -h all

0.Re-enable observium cronjobs [optional]

4.You may now delete your observium_old directory if everything has updated correctly:
#rm -rf observium_old

5.Reboot Server

web referrence : https://docs.observium.org/install_debian/


วันศุกร์ที่ 9 พฤศจิกายน พ.ศ. 2561

การเปิด Sharing SMB1 ใน Windows 10 10 Build 1803 เพื่อให้มองเห็นไฟล์แชร์จาก OS เวอร์ชั่นเก่า

1. ค้นหาคำว่า ‘Turn Windows features on or off’ ในเมนู Search 
2. ติ๊กที่ช่อง  ‘SMB1.0/CIFS File Sharing Support’ 
3. Restart เครื่อง 1 ครั้ง

วันพุธที่ 29 สิงหาคม พ.ศ. 2561

ติดตั้ง NTP Server CentOS

ntp : ntpd server which continuously adjusts system time and utilities used to query and configure the ntpd daemon.
ntpdate : Utility to set the date and time via NTP.
ntp-doc : NTP documentation

Setup NTPD on CentOS Linux
# yum install ntp ntpdate ntp-doc

Turn on service, enter:
# chkconfig ntpd on

Synchronize the system clock with 0.pool.ntp.org server (use this command only once or as required):
# ntpdate pool.ntp.org

Start the NTP server. The following will continuously adjusts system time from upstream NTP server. No need to run ntpdate:
# /etc/init.d/ntpd start

web reference : https://www.cyberciti.biz/faq/howto-install-ntp-to-synchronize-server-clock/