วันอาทิตย์ที่ 8 พฤศจิกายน พ.ศ. 2558

วิธีปิดการทำงานของ Windows Defender ใน Windows 10


1. เข้าเมนู RUN โดยกดที่ปุ่มสัญญลักษณ์ Windows + R
2. พิมพ์คำว่า gpedit.msc
3. ขึ้นหน้าต่าง Local Group Policy Editor

4. ที่หัวข้อ Computer Configuration
เลือก Administrative Templates --> Windows Components --> Windows Defender
ดูเมนูทางด้านขวามือ ให้เลือกที่ Turn Off Windows Defender


5. ดับเบิลคลิกที่  Turn Off Windows Defender แล้วเลือก Disable หลังจากนั้นกด OK ออกมา
เสร็จสิ้นการปิด Windows Defender 

เว็บอ้างอิง : http://slashgenie.com/permanently-disable-windows-defender-in-windows-10/

วันอังคารที่ 13 ตุลาคม พ.ศ. 2558

ติดตั้ง SpeedTest บน Ubuntu Server 14.04

SPEEDTEST.NET SERVER INSTALLATION:

STEP 1: INSTALLATION OF APACHE
It is the world’s most wildly used web server that about more than 50% websites run on Apache web server. Following are the steps given to install Apache web server. Open terminal using Ctrl+ alt + T, and Enter the following command.
# apt-get install apache2
STEP 2: INSTALLATION OF PHP
Now, after installing Apache web server , you need to install Php packages, run following command in terminal,
# apt-get install php5 php5-mysql php5-gd php5-mcrypt
STEP 3: DOWNLOAD SPEEDTEST MINI SERVER
Now, download the speedtest.net mini server packages from official website.
For downloading we use wget command. Now run the following command in terminal,
# wget http://c.speedtest.net/mini/mini.zip
Now, we need to extract mini.zip and copy all files into /var/www/html
# unzip mini.zip
Now, copy folder into /var/www/html/
#cp -rRfv mini /var/www/html/
Now we need to assign ownership of the files and folders to Apache’s user and group,
# chown -R www-data:www-data /var/www/html/mini
Go to /var/www/html/mini and edit required settings,
move index-php.html to index.html by using mv command,
# cd /var/www/html/mini
# mv index-php.html index.html
Now, Restart Apache service and mysql service,
#systemctl restart apache2
STEP 5: INSTALLATION OF FLASHPLAYER
The flash player required foe speedtest.net server. If flash-player is not installed in your system, install it by using the following command,
# apt-get install flashplugin-installer
SPEEDTEST MINI WEB INTERFACE:
Now, open your browser and open http://server_domain_name_or_IP/mini orhttp://localhost/mini


Reference : http://www.ewikitech.com/articles/linux/speedtest-net-server-install-in-ubuntu-15-04/

วันศุกร์ที่ 14 สิงหาคม พ.ศ. 2558

Ubuntu 14.04 Lost Password Recovery

If you have forgotten or lost your root password and unable to login to your Ubuntu 14.04 linux system then follow the instructions below to recover your root password.

1. Step 1 - Reboot to GRUB2 boot menu

First reboot/reset your system to GRUB2 boot loader menu. Navigate to the menu item you normally boot you Ubuntu system from and press "e" for edit.

2. Step 2 - Modify boot options

Find the line which starts with "linux". Navigate to the end of the line and add:
init=/bin/bash
as illustrated on the screen-shot below: Ubuntu 14.04 Lost Password Recovery Grub 2

3. Step 3 - Boot your system

Once you have changed boot options as indicated in the previous step press F10 to instruct your Ubuntu system to boot. Your system will boot and you will be provided with root command line prompt. 

4. Step 4 - Reset your Lost Password

Once you get to the command line prompt enter the following commands:
# mount -o remount,rw /
# passwd
HERE YOU CHANGE YOUR PASSWORD
# reboot -f
Lost Password Recovery complete.

5. Step 5 - Login with your new password

Once you reboot login as root user with your new password.

Site Reference : http://linuxconfig.org/ubuntu-14-04-lost-password-recovery

วันพฤหัสบดีที่ 16 กรกฎาคม พ.ศ. 2558

แก้ปัญหา VMware Data Recovery Integrity Check fails

Resolution

To remove the lock files:
  1. Log in to the VMware Data Recovery (VDR) appliance through the console with the root username and password.
  2. Stop the VDR application to ensure that any valid locks being used are removed:

    # service datarecovery stop 
  3. Change to the destination datastore and remove all .lck files from all destination datastores. For example, to remove the file store.lck file from destination SCSI-0\:1, run the commands:

    # cd /SCSI-0\:1/VMwareDataRecovery/BackupStore/
    # rm -rf store.lck 


    Note: To find all *.lck files, run this command:

    # find / -name *.lck 
  4. Restart the VDR application after all lock files have been removed

    # service datarecovery start
อ้างอิง: http://kb.vmware.com/selfservice/microsites/search.do?language=en_US&cmd=displayKC&externalId=1018060

วันอาทิตย์ที่ 14 มิถุนายน พ.ศ. 2558

การตั้ง AutoStart และ Full Screen Chrome Browser (Private Mode)


การตั้ง AutoStart และ Full Screen Chrome Browser

1. คลิกขวาที่
icon Google Chrome เลือก properties
2. คลิกปุ่ม Open File Location ก๊อปปี้ path ที่เก็บไฟล์ไว้ ดังตัวอย่าง
C:\Program Files (x86)\Google\Chrome\Application\chrome.exe
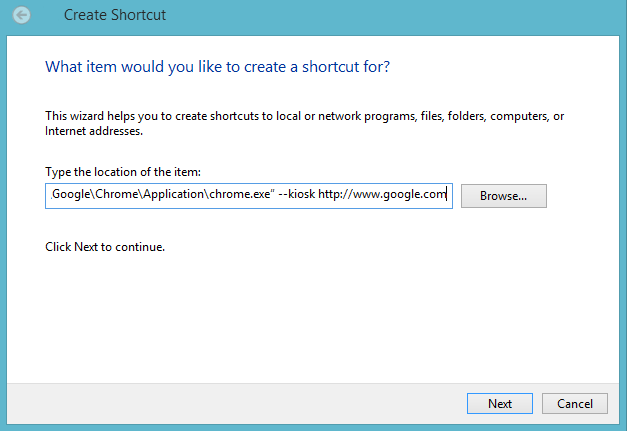
3. คลิกขวาที่ Desktop เลือกเมนู New
à Shortcut
4. Copy Path ของ Chrome ไปวางในช่อง Type the location .. และเพิ่มคำสั่ง –kiosk และต่อท้ายด้วยเว็บที่ต้องการเปิด ดังตัวอย่าง
"C:\Program Files (x86)\Google\Chrome\Application\chrome.exe" 
-incognito --kiosk http://www.google.com
โดย-incognito คือตั้งค่า Private Mode--kiosk คือตั้งค่าให้ start full screen
http://(website) คือเว็บที่ต้องการให้เปิดหน้าแรก


5. คลิก Next 
6. ตั้งชื่อ Shortcut ที่ต้องการ แล้วกด Finish
7. ก๊อปปี้ Shortcut ไปวางใน Folder Startup ของ Windows 

วันจันทร์ที่ 27 เมษายน พ.ศ. 2558

การติดตั้ง php syslog viewer บน ubuntu

การติดตั้ง php syslog viewer บน ubuntu

อ้างอิง http://citec.us/forum/index.php?showtopic=23359&mode=threaded&pid=55496 จัดทำเมื่อ 1/12/2008
ทดลองบน Ubuntu 8.04
บทนำ
  1. ติดตั้ง syslog-ng ด้วยคำสั่ง
    apt-get install syslog-ng
  2. ดาวน์โหลดโปรแกรม php syslog viewer ด้วยคำสั่ง
    wget http://downloads.sourceforge.net/phpsyslogviewer/phpsyslogviewer-7.2.1.tar.bz2
  3. ติดตั้งโปรแกรม bzip2 ด้วยคำสั่ง
    apt-get install bzip2
  4. แตกไฟล์ phpsyslogviewer ด้วยคำสั่ง
    tar xjvf phpsyslogviewer-7.2.1.tar.bz2
  5. ดาวน์โหลดโปรแกรม speedupd ซึ่งเป็นโปรแกรมเร่งความเร็วให้เอนจิ้นป้อนข้อมูลสู่ฐานข้อมูล mysql ด้วยคำสั่ง
    wget http://jaist.dl.sourceforge.net/sourceforge/phpsyslogviewer/speedupd-7.3.2.tar.bz2
  6. ในโฟลเดอร์ install ของ phpsyslogviewer จะมีสคริปที่ใช้ติดตั้งตารางต่าง ๆ ให้กับฐานข้อมูล เราจะต้องทำการสร้างฐานข้อมูลเสียก่อน มิฉะนั้นจะพบกับข้อผิดพลาดและไม่สามารถรันสคริปดังกล่าวผ่านได้ มีขั้นตอนดังนี้
    1. เปลี่ยนไดเร็กทอรี่ไปยังโฟลเดอร์ phpsyslogviwer-7.2.1
    2. เข้าสู่ mysql ด้วยคำสั่ง
      mysql -u root -p แล้วป้อนรหัสผ่านของ root
    3. สร้างฐานข้อมูลชื่อ syslogng ด้วยคำสั่ง
      mysql>create database syslogng;
    4. ออกจาก mysql ด้วยคำสั่ง
      mysql>exit;
    5. สร้างตารางข้อมูลด้วยการใช้ script จากไฟล์ install/phpsyslogviewer.sql ด้วยคำสั่ง
      mysql -u root -p syslogng < install/phpsyslogviewer.sql
  7. ป้อนค่า username และ password เข้าไปในไฟล์ intalll/newuser.sql.php ดังเช่น
    $user = "myuser"; // Your Username
    $pass = "mypassword"; // Your Password
  8. ติดตั้งโปรแกรม php5-cli เพื่อให้รันคำสั่ง php ผ่าน command line ด้วยคำสั่ง
    apt-get install php5-cli
  9. รันภาษา php-command line เพื่อ insert ข้อมูล user และ pass เข้าสู่ตารางข้อมูล user ของฐานข้อมูล syslogng ด้วยคำสั่งดังนี้
    php install/newuser.sql.php
  10. รันภาษา php-command line ด้วยคำสั่งต่อไปนี้
    php install/newuser.sql.php | mysql -u root -p syslogng
  11. จัดการเว็บไดเรคทอรีเพื่อให้สามารถเรียกดูข้อมูลผ่านเวบบราวเซอร์ได้ ด้วยการสำเนาไฟล์ ด้วยคำสั่งดังนี้
    cp -R htdocs /var/www/phpsyslogviewer
  12. แก้ไขไฟล์คอนฟิกคือ /var/www/phpsyslogviewer/config.php เพื่อกำหนดค่าที่สำคัญเกี่ยวกับฐานข้อมูลดังนี้
    $db_user = "root"; // Database Username
    $db_pass = "rootpass"; // Database Password
    $db_host = "localhost"; // Database Hostname
    $db_name = "syslogng"; // Database Name
  13. รันคำสั่งต่อไปนี้
    chown root:www-data /var/www/phpsyslogviewer/config.php
    chmod 440 /var/www/phpsyslogviewer/config.php
  14. เข้าดูเว็บไซต์ของ phpsyslogviewer ได้ที่ http://ipaddress/phpsyslogviewer และจะได้หน้าต่างดังรูป


  15. เมื่อ Login แล้วจะได้หน้าต่างดังนี้


  16. ติดตั้งแพ็คเกจ speedupd-7.3.2 เพื่อเร่งความเร็วให้เอนจิ้นป้อนข้อมูลสู่ฐานข้อมูล mysql ขั้นตอนนี้อาจยุ่งยากนิดหน่อย เพราะต้องทำการคอมไพล์แพ็คเกจด้วยตัวเองใหม่ ขอย้ำว่าต้องทำนะครับขั้นตอนนี้ มิฉะนั้นใครที่เคยใช้ phpsyslog-ng จะรู้ซึ้งว่าอึดอัดเป็นอย่างไร ให้ทำตามคำสั่งต่อไปนี้
    tar xjvf speedupd-7.3.2.tar.bz2
    cd speedupd-7.3.2
    apt-get install debhelper cmake libdaemon-dev libconfuse-dev fakeroot
    dpkg-buildpackage -rfakeroot
    ถ้า่มีปัญหาให้อ่านดู อาจจะต้องติดตั้ง libmysqlclient15-dev เิพิ่มเติมด้วยคำสั่ง
    apt-get install libmysqlclient15-dev
  17. ตอนนี้เราจะได้แพ็คเกจตระกูล debian ชื่อว่า speedupd_7.3.0_i386.deb (สำหรับ 64 bit OS จะชื่อ speedupd_7.3.0_amd64.deb) ให้ติดตั้งแพ็คเกจและกำหนดค่าให้กับไฟล์ speedupd.confดังนี้
    cd ..
    dpkg -i speedupd_7.3.0_i386.deb 
    (สำหรับเครื่องที่เป็น 64 bit ใช้ speedupd_7.3.0_amd64.deb) 
    vi /etc/speedupd.conf
    /etc/init.d/speedupd start
  18. ต่อไปเป็นการกำหนดค่าให้กับ syslog-ng ทำการส่งค่าไปเก็บยังฐานข้อมูลทำตามนี้เลยครับ ง่าย ๆ ผู้เขียนตัดวิธีการเก็บข้อมูลการจราจรคอมพิวเตอร์ส่วนอื่นออก เพื่อให้สามารถทำความเข้าใจได้ง่าย ๆ ครับ หากใครมีไฟล์คอนฟิคเก่าอยู่แล้วก็เพิ่มเติมเฉพาะส่วนที่ต้องการเก็บข้อมูลในฐานข้อมูลได้เลยครับ  โดยให้แก้ไขในไฟล์ /etc/syslog-ng/syslog-ng.conf เป็นดังต่อไปนี้ ซึ่งถ้าส่วนไหนมีอยู่แล้วก็ไม่ต้องนะครับ

    options {
                recv_time_zone (+07:00);
                send_time_zone (+07:00);
                sync (0);
                time_reopen (100);
                log_fifo_size (1000);
                long_hostnames (off);
                use_dns (no);
                use_fqdn (no);
                create_dirs (yes);
                chain_hostnames(yes);
                keep_hostname (yes);
    };

    source s_sys {                                                                       
                       file ("/proc/kmsg" log_prefix("kernel: "));
                       unix-stream ("/dev/log");
                       internal();
                       udp(ip(0.0.0.0) port(514));
                       tcp(ip(0.0.0.0) port(514) keep-alive(yes));
    };

    destination d_mysql {pipe("/var/log/mysql.pipe" template("INSERT INTO logs (host, facility, priority, level, tag, datetime, program, msg) VALUES ( '$HOST', '$FACILITY', '$PRIORITY', '$LEVEL', '$TAG', '$YEAR-$MONTH-$DAY $HOUR:$MIN:$SEC', '$PROGRAM', '$MSG' );\n") template-escape(yes));
    };

    filter f_kernel { facility (kern); };
    filter f_messages { level(info..emerg) and not (facility(mail) or facility(authpriv) or facility(cron)); };

    log {source(s_sys); filter(f_messages); destination(d_mysql); };

    log {source(s_sys); filter(f_kernel); destination(d_mysql); };
  19. สร้างสคริปเพื่อทำไปน์สำหรับส่งค่าสตรีมจากไปน์สู่ฐานข้อมูล งานนี้เป็น bash สคริปครับ ฟังดูวุ่นวายแต่ทำจริงง่ายมากครับ ให้สร้าง script file ด้วยคำสั่งต่อไปนี้
    # vim syslog2mysql.sh
  20. แล้วใส่ข้อมูลต่อไปนี้ลงไปในไฟล์  แล้วบันทึกไฟล์

    #!/bin/bash
    if [ ! -e /var/log/mysql.pipe ]
    then
    mkfifo /var/log/mysql.pipe
    fi
    while [ -e /var/log/mysql.pipe ]
    do
    mysql -u root --password=radius syslogng < /var/log/mysql.pipe >/dev/null
    done

  21. ทำการเปลี่ยนสิทธิไฟล์ แล้วรันคำสั่งต่อไปนี้
    # chmod +x syslog2mysql.sh

    # ./syslog2mysql.sh &

    # /etc/init.d/syslog-ng start
  22. เมื่อเปิดข้อมูลผ่านเว็บดูจะไ้ด้ดังรูป ซึ่งเ็ป็นตัวอย่างที่มี Total Hosts จำนวน 1 Hosts

จบครับ