ในการขยายพื้นที่ใน VMware Esxi สามารถทำได้ 2 แบบ คือการ Add Harddisk เพิ่มเข้าไปอีก 1 ตัว และอีกวิธีนึงคือการขยายจากเนื้อที่เดิมที่มีอยู่ให้มากขึ้น ซึ่งในแบบที่จะทำคือการขยายพื้นที่เดิม เช่นจาก 30 GB เป็น 80 GB ในตัวอย่างจะสาธิตการขยายเนื้อที่จาก 5.70 GB เป็น 8.69 GB

xpanding a Linux disk with gparted (and getting swap out of the way)

Over the past year or so there have been a few times where I've need to expand a disk attached to a Debian system. Now this isn't a hard task by any means, and may not even warrant a blog post, but the matter of it is that I always seem to forget the steps I need to take to get that unallocated space that I've added next to my actual EXT3 partition since the swap partition is always in the way! So, I thought I would just throw up how I've done it in the past in hopes to maybe help a few others that visit, but more-so for myself and my memory (or lack there of). Now keep in mind I'm sure there are ways to perform this exact same thing without taking the VM online, or I'm sure there are other 'better' ways to achieve the same results, but this way has worked for me consistently so it's what I chose to do. Any other suggestions are certainly welcome in the comment box below.
First off, you will need to expand your drive from within the vSphere Client, not rocket science here, pretty simple to do. Next, get yourself a copy of gparted and mount the ISO to your VM and reboot booting into the gparted interface (accept all defaults for keymap, X, and resolutions, unless of course you like playing…). So the first thing you will notice inside gparted is that the swap partition is right smack in the middle of your EXT3 partition and the unallocated space. Normally, you could just resize the EXT3 partition and consume the unallocated space, but with swap there you can't.


So, the goal is to migrate the unallocated space to precede the swap partition. This is done so using the following procedure..
First, resize your extended partition (not the one labeled linux-swap) to include the free space. In my case this is done by selecting /dev/sda2 and then selecting the Resize/Move button. In the popup, simply drag the arrow on the right side of the bar to include all of the free space available and again select Resize/Move.


Just to note, we are not actually performing and moves or resizes at this point, we are simply just creating a chain of commands that gparted will follow once it is applied. You can either apply at the end of each step, or wait till the bitter end and do it, its up to you. Either way when you are done, you should see your unallocated space move into /dev/sda2 as shown below.


So, as you can see from the screen capture, the next thing we need to do is move that swap partition to the end of /dev/sda2. This will allow us to proceed with the next few steps that we need to perform in order to accomplish our end goal of expanding /dev/sda1. This time we will need to select the linux-swap partition (/dev/sda5) and select Resize/Move. Inside the popup, this time click the actual white space inside the partition and drag the complete box over to the right (don't use the arrows). This will move the swap partition to the end of /dev/sda2 for us which we will next resize. Once your looking like the below images, again, click 'Resize/Move'.


Alright, now we are getting somewhere, you should be looking pretty similar to the shot below by now. And yes you guessed it, now we need to move that unallocated space right outside of /dev/sda2 in order to make it available for the expansion of /dev/sda1.


So, once again select /dev/sda2 and select 'Resize/Move'. This time we will use the arrows. What we want is to move the left arrow this time to the right all the way over to edge of the yellow box (swap). This will resize the complete /dev/sda2 to the same size as the swap it contains (/dev/sda5) and in turn, create that unallocated space in between the partitions. Once done, click 'Resize/Move'.


Alright, almost there, you should be somewhat similar to the screenshot below. Our unallocated space is now directly next to our EXT3 partition and no long a member of /dev/sda2.


At this point I usually apply the first three operations before the expansion. I've noticed sometimes the process will error out if trying to do the following steps without applying first, so go ahead and apply those operations (Hit 'Apply')
So we are now able to simply extend /dev/sda1 into that unallocated space. Similar to when we extended /dev/sda2, this time select /dev/sda1, click 'Resize/Move'. In the popup as we did earlier, select the arrow at the right side of the partition, and drag it to the right to merge sda1 with the unallocated space, when done, select 'Resize/Move'.
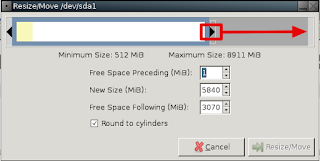


So, there you have it! We have moved that unallocated space into our EXT3 partition. Go ahead and hit apply again to commit that final change and at the end of the process you should have a larger /dev/sda1.


Now, like I said at the beginning, I'm sure there are ways to do this while the VM is online, or I could be doing things completely wrong, but this way has consistently worked for me for both Linux and Windows guests. That being said, I'm open to other suggestions, leave them your comments, concerns, thoughts, etc below in the comments … 
Web Reference : http://blog.mwpreston.net/2012/06/22/expanding-a-linux-disk-with-gparted-and-getting-swap-out-of-the-way/
Web Reference : http://blog.mwpreston.net/2012/06/22/expanding-a-linux-disk-with-gparted-and-getting-swap-out-of-the-way/