วันอังคารที่ 30 มิถุนายน พ.ศ. 2569

วิธีแสดง windows รุ่นต่างๆที่จะติดตั้งจาก Windows-Multi-Edition.iso

 1. โหลดไฟล์ windows จาก https://www.microsoft.com/en-us/software-download
2. เมื่อได้ไฟล์มาแล้ว ให้ extract ไฟล์ออกมา หรือ ใช้โปรแกรมเปิดไฟล์ ISO เช่น UltraISO
3. เปิด Notepad สร้างไฟล์ ei.cfg โดยใส่ข้อความดังนี้


4. เสร็จแล้ว ให้ก๊อปปี้ไฟล์นี้ ไปใส่ใน Win11-ConsumerEdition\sources\
5. กด save iso ใหม่ 
6. นำไปใช้งานด้วย rufus
7. เมื่อติดตั้งจะขึ้น edition ให้เลือกดังภาพ


วันจันทร์ที่ 29 ธันวาคม พ.ศ. 2568

VMD USB Builder + VMD USB Installer

ตัวสร้าง USB แบะติดตั้ง VMD Drivers แก้ปัญหาลง Win แล้วไม่เจอ HDD/SSD


อัพเดทเพิ่มเติม คือ
📋 Change Log. USB Builder.ps1
1. ดึงไฟล์ตรงจากเว็บ Intel
2. แตกไฟล์สด ๆ เตรียม
3. สแกนหาไดร์ฟ USB
4. ก๊อปปี้ไฟล์ลง USB
5. ล้าง/Clean ไฟล์ใน %temp%


📋 Change Log. USB Installer.cmd
1. ตรวจสอบ HWID ของ VMD ในเครื่อง
2. สแกนหาไดร์ฟของ Windows เก่า
3. VBscript แจ้งเตือน ตอบ Yes/No. Exit
--------------------------------------------------

วิธีทำ
1.เปิด PowerShell หรือ Terminal ขึ้นมา
2.พิมพ์ iex(irm bit.ly/VMDUSBBuilder) แล้วกด Enter
3.ที่มา: https://gitlab.com/itgroceries/itg_vmd_builder

https://www.facebook.com/ITGroceries

วันอาทิตย์ที่ 14 ธันวาคม พ.ศ. 2568

Bypass ขั้นตอนการ Login UserName ใน Windows 11 24H2

ในขั้นตอนการติดตั้ง  Windows 11 22H2 ,24H2 เมื่อมาถึงหน้านี้ และไม่มีข้อความ Sign-in options แล้ว ให้ทำวิธีต่อไปนี้


0. Disconnnect Internet 
1. Shift + F10
2. oobe\bypassnro
3. ถ้าไม่ผ่าน ใช้คำสั่งใหม่ คือ start ms-cxh:localonly

วันศุกร์ที่ 8 สิงหาคม พ.ศ. 2568

ปิดการอัพเดต windows


1.Run CMD ด้วย Admin(ถ้าไม่ Run admin จะ Stop ไม่ได้)

net stop wuauserv

net stop bits

ren C:\Windows\SoftwareDistribution SoftwareDistribution.old

net start wuauserv

net start bits


ref : ช่างเปา ซ่อมโน๊ตบุ๊ค หาดใหญ่


วันพุธที่ 30 ตุลาคม พ.ศ. 2567

วิธี Backup Driver Windows 10-11 ผ่าน Command prompt

1. ไปสร้างโฟลเดอร์สำหรับเก็บไฟล์ Backup ไว้ที่ Drive D ด้วยชื่อ BackupDriverexport เช่น D:\BackupDriverexport 

2. เข้า cmd ด้วย สิทธ์ administrator 
3. พิมพ์คำสั่ง dism /online /export-driver /destination:"D:\BackupDriverexport" ดังตัวอย่าง

4. จากนั้น กด Enter รอทำงานจนเสร็จ แล้วปิดหน้าต่างนี้ไป


5. ไฟล์และโฟลเดอร์ที่ Backup

อ้างอิง : https://www.tenforums.com/tutorials/68426-backup-restore-device-drivers-windows-10-a.html


วันจันทร์ที่ 8 พฤษภาคม พ.ศ. 2566

แก้ปัญหา local group policy ใน Windows 11 ไม่มี

ถ้าใช้คำสั่ง gpedit.msc แล้วไม่ขึ้น ให้แก้ไขดังนี้ 

1.เปิด Notepad แล้วก๊อปข้อความ ข้างล่างนี้ไปวาง

  1. @echo off
  2. pushd "%~dp0"
  3.  
  4. dir /b %SystemRoot%\servicing\Packages\Microsoft-Windows-GroupPolicy-ClientExtensions-Package~3*.mum >List.txt
  5. dir /b %SystemRoot%\servicing\Packages\Microsoft-Windows-GroupPolicy-ClientTools-Package~3*.mum >>List.txt
  6.  
  7. for /f %%i in ('findstr /i . List.txt 2^>nul') do dism /online /norestart /add-package:"%SystemRoot%\servicing\Packages\%%i"
  8. pause

2.จากนั้น save ชื่ออะไรก็ได้ ให้นามสกุล .bat

3.เมื่อได้ไฟล์มาแล้ว ให้รันโดยการคลิกขวาที่ไฟล์ เลือก Run As Administrator

4. รอจนเสร็จ แล้วค่อยใช้คำสั่ง gpedit.msc อีกครั้ง

อ้างอิง : https://pastebin.com/AP5y7v5B , https://youtu.be/R3vzR9njBOw


วันจันทร์ที่ 31 ตุลาคม พ.ศ. 2565

วิธีข้ามขั้นตอนการ Login UserName ใน Windows 11 22H2

ในขั้นตอนการติดตั้ง  Windows 11 22H2 ,24H2 เมื่อมาถึงหน้านี้ และไม่มีข้อความ Sign-in options แล้ว ให้ทำวิธีต่อไปนี้

1. Shift + F10
2. oobe\bypassnro
3. ถ้าไม่ผ่าน ใช้คำสั่งใหม่ คือ start ms-cxh:localonly


1. ถอดสายแลน ออกก่อน หรือ Disconnect Network ทั้งหมด
2. กด Shift + F10 จะขึ้นหน้า Cmd


3. จากนั้นพิมพ์คำสั่ง oobe\bypassnro ต่อท้าย และกด Enter


4. จากนั้นเครื่องจะ Restart 1 ครั้ง และกลับมาสู่หน้าจอการติดตั้งอีกครั้ง 
5. ทำการติดตั้งไปถึงถึงหน้าการเชื่อมต่ออินเตอร์เน็ต ให้คลิกที่ i don't have internet
6. คลิก Connect with Limite Setup


7. จากนั้นทำตามขั้นตอนปกติได้เลย

web reference: https://pureinfotech.com/bypass-internet-connection-install-windows-11/


วันอังคารที่ 31 พฤษภาคม พ.ศ. 2565

การติดตั้ง Extension ใช้งาน IE11 ใน Microsoft Edge Windows 11

1.เปิด Microsoft Edge
2. กดที่จุด 3 จุด เลือก Extensions

3. ค้นหา IE Tab จากนั้นกด Get เพื่อติดตั้ง

4. กด Add Extensions


5. กดที่รูปจิ๊กซอร์ และกดที่รูปตา เพื่อให้แถบแสดง IE Tab จะเห็นรูปไอคอน e แสดงขึ้นมา

6. กดที่รูป e เว็บจะแสดงแถบอีก 1 แถบ สำหรับใช้งานกับเว็บที่ใช้ IE11 ให้ใส่ URL ที่ต้องการในช่องนี้

ส่วนใหญ่จะเป็นเว็บของทางราชการ ที่ไม่สามารถ หรือไม่รองรับกับ Browser รุ่นใหม่ๆได้


วันพฤหัสบดีที่ 25 พฤศจิกายน พ.ศ. 2564

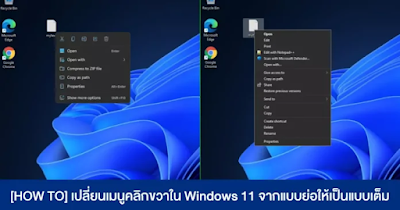
เปลี่ยนเมนูคลิกขวาใน Windows 11 จากแบบย่อให้เป็นแบบเต็ม


สำหรับใครที่ประสบปัญหาการคลิกขวาใน Windows 11 ที่มักจะทำให้เกิดความล่าช้าในกาทำงาน เนื่องจากมันไม่ยอมแสดงหน้าเมนูที่เราต้องการ วันนี้ผมมีวิธีปรับให้ Windows แสดงหน้าเมนูคลิกขวาแบบเต็ม ๆ แล้วครับ

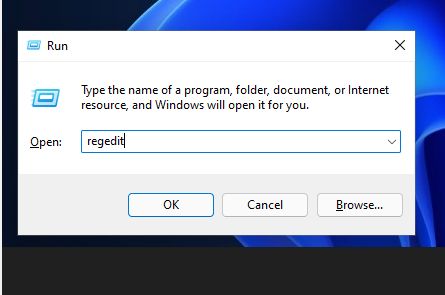
1.เริ่มแรกให้เปิด Run ขึ้นมาก่อน แล้วพิมพ์ regedit (หรือพิมพ์ลงในช่องค้นหาจากทาสก์บาร์ก็ได้)

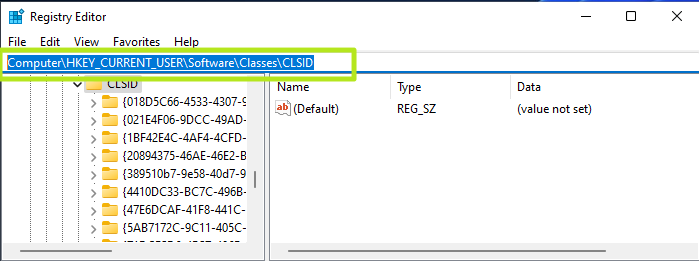
2.เปิดมาจะเป็นหน้าของ Registry Editor ให้เราเปิดไล่ทีละส่วน โดยไปที่ HKEY_CURRENT_USER > SOFTWARE > CLASSES > CLSID

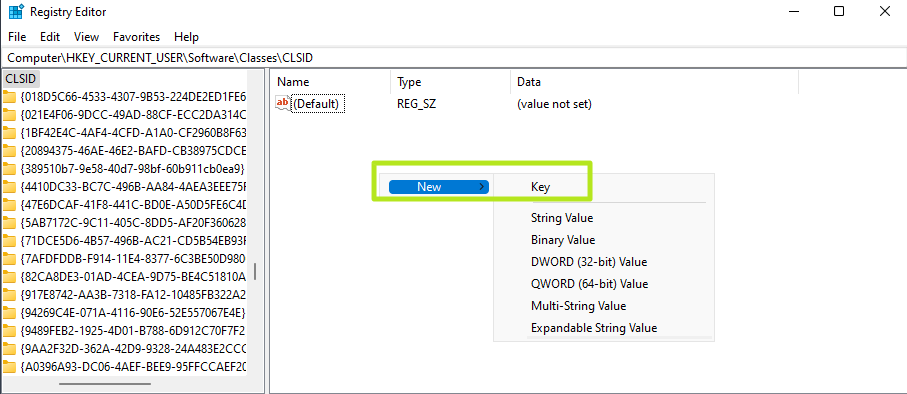
 3.ให้สร้างโฟลเดอร์ใหม่ขึ้นมาใน CLSID โดยเอาให้เราสร้างคีย์ขึ้นมาใหม่ (คลิกที่ CLSID 1 ทีก่อนนะ แล้วเข้าไปคลิกขวาตามภาพอีกที) ตั้งชื่อโฟลเดอร์ว่า {86ca1aa0-34aa-4e8b-a509-50c905bae2a2}

4.จากนั้น ให้คลิกขวาที่โฟลเดอร์ {86ca1aa0-34aa-4e8b-a509-50c905bae2a2} ที่สร้างขึ้นใหม่ แล้วเลือก New > Key ออกครั้ง สร้างโฟลเดอร์ย่อยที่มีชื่อว่า InprocServer32

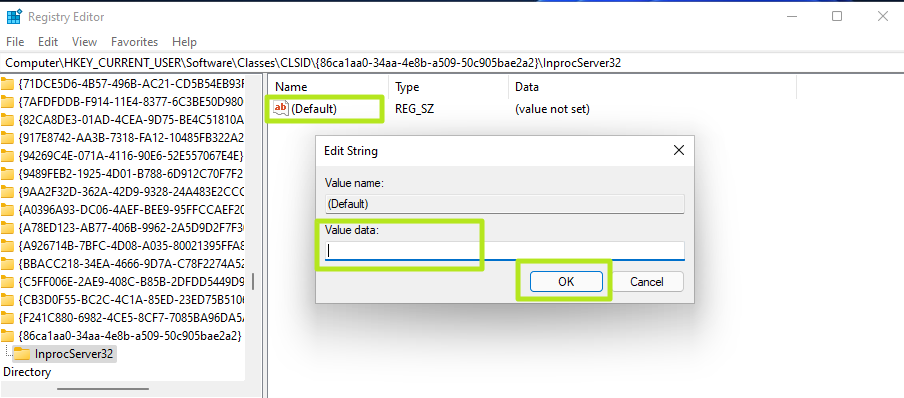
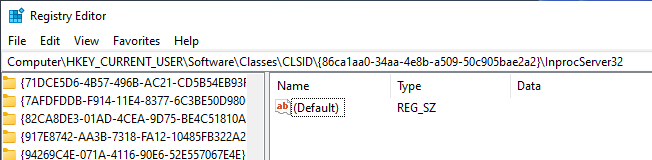
5.ในโฟลเดอร์ InprocServer32 ให้เราคลิกขวาที่ (Default) จากนั้นไม่ต้องใส่อะไร ให้กด OK ไปเลย (จะเห็นการเปลี่ยนแปลงคือ ค่าตรง Data จะเปลี่ยนจาก (value not set) เป็นค่าเปล่า ๆ)

6.กดปิด Registry Editor แล้วรีบูตเครื่องเท่านี้ก็เรียบร้อยครับ

ขอขอบคุณข้อมูลจาก Tom’s Hardware และ https://www.extremeit.com/how-to-windows-11-right-click/

วันพฤหัสบดีที่ 21 ตุลาคม พ.ศ. 2564

วิธีการการลบ Browser Microsoft Edge ออก (แก้ปัญหาเว็บราชการ)

 How to uninstall Microsoft Edge with Command Prompt 


You can forcibly uninstall Edge from Windows 10 through Command Prompt, using the commands we’ll provide below. But first, you'll need to find out exactly which version of Edge is installed on your PC.

1. Open Edge and click the three-line button in the top-right corner of the browser. Select “Help & feedback,” then “About Microsoft Edge.” 

Make a note of the version number below the browser name at the top of the page, or copy and paste it somewhere for reference.


(Image credit: Tom's Guide)


2. Next, open Command Prompt as an administrator. To do this, type "cmd" in the Windows search box and select “Run as administrator” next to Command Prompt at the top of the results list. 


(Image credit: Tom's Guide)

3. When Command Prompt opens, type (or copy and paste) the following command, but replace the “xxx” with the Edge version number from step 1, for example “92.0.902.62."

cd %PROGRAMFILES(X86)%\Microsoft\Edge\Application\xxx\Installer 

Press Enter and Command Prompt will switch to Edge’s Installer folder. Now type (or copy and paste) the following command:

setup.exe --uninstall --system-level --verbose-logging --force-uninstall

(Image credit: Tom's Guide)

4. Press Enter and Edge will instantly be uninstalled from Windows 10, without you needing to restart your PC. 

The browser's shortcut icon will disappear from your taskbar, though you may still see an Edge entry in the Start menu. However, this won’t do anything when clicked. 

reference :  https://www.tomsguide.com/how-to/how-to-uninstall-microsoft-edge

วันศุกร์ที่ 6 ธันวาคม พ.ศ. 2562

วิธีแก้ Update ESXi6.5.4564106 to ESXi6.5 Update3 (Build14990892) แล้วขึ้น Error ‘L1 Terminal Fault - VMM’ CVE-2018-3646 (55806)


Enabling the ESXi Side-Channel-Aware Scheduler using the vSphere Web Client or vSphere Client
1. Connect to the vCenter Server using either the vSphere Web or vSphere Client.
2. Select an ESXi host in the inventory.
3. Click the Manage (5.5/6.0) or Configure (6.5/6.7) tab.
4. Click the Settings sub-tab.
5. Under the System heading, click Advanced System Settings.
6. Click in the Filter box and search VMkernel.Boot.hyperthreadingMitigation
7. Select the setting by name and click the Edit pencil icon.
8. Change the configuration option to true (default: false).
9. Click OK.
10. Reboot the ESXi host for the configuration change to go into effect.


Web Reference : https://kb.vmware.com/s/article/55806?fbclid=IwAR2WCb5N--clOhDfca6-WnvQ0pXLllkhhcpJo4MlfudWJ9_IvrvfdSDpoHU

วันพฤหัสบดีที่ 30 พฤษภาคม พ.ศ. 2562

ตรวจสอบ Key ที่ Activate ว่าใช้ได้นานแค่ไหน Windows 10

1. เข้า cmd
2. พิมพ์ slmgr /xpr 
3. จะขึ้นบอกว่า cd-key ใช้ได้นานแค่ไหน


web reference : https://www.ghacks.net/2015/08/01/check-if-windows-10-is-activated/

วันเสาร์ที่ 11 พฤษภาคม พ.ศ. 2562

กรณี Update Build Esxi 5.5 แล้วขึ้น esx.problem.hyperthreading.unmitigated

1.หลังจากที่อัพเดต Build ของ Esxi 5.5 แล้วขึ้นดังภาพ

2.ให้เข้าไปที่ แถบ Configuration ที่หัวข้อ Software เข้าไปที่ Advance Settings
3.หาหัวข้อ UserVers และด้านซ้ายหาคำว่า UserVers.SuppressHyperthedinWarning
4.จากนั้นเปลี่ยนค่าจาก 0 ให้เป็น 1 แล้วกด OK

อ้างอิง https://kb.vmware.com/s/article/57374

วันพุธที่ 1 พฤษภาคม พ.ศ. 2562

การ Upgrade Cacti 0.8.8 เป็น Version 1.2.3 ใน Ubuntu 16.04


ลิงค์การติดตั้ง Cacti https://sulkiflee-n.blogspot.com/2019/05/cacti-monitoring-ubuntu-1604.html

1.Install needed package
#apt-get install php-ldap php-gd
Backup Database
#mysqldump -l -ucacti -pPassword –add-drop-table cacti > mysql.cacti

2.Download and Prepare Cacti Installation# wget https://www.cacti.net/downloads/cacti-latest.tar.gz# tar xfz cacti-latest.tar.gz 
3.Backup the Old Cacti#mv /usr/share/cacti/site /usr/share/cacti/site_old
4.Replace with the New Cacti
#mv cacti-1.2.3 /usr/share/cacti/site
5.Copy Needed Scripts, Resource, and Graphs
#cp -u -R /usr/share/cacti/site_old/scripts/* /usr/share/cacti/site/scripts
#cp -u -R /usr/share/cacti/site_old/resource/* /usr/share/cacti/site/resource/
#cp /var/lib/cacti/rra/* /usr/share/cacti/site/rra/ #Doesn’t work
#chmod 777 rra/*
#mv /usr/share/cacti/site/rra /usr/share/cacti/site/rra_old
#ln -s /var/lib/cacti/rra /usr/share/cacti/site/rra

6.Modify the Cacti Configuration File to Connect Database#nano /usr/share/cacti/site/include/config.php
$database_type = ‘mysql’;
$database_default = ‘cacti’;
$database_hostname = ‘localhost’;
$database_username = ‘cacti’;
$database_password = ‘Password’;
$database_port = ‘3306’;
$database_ssl = false;

7.Create TimeZone Table in Database
#mysql_tzinfo_to_sql /usr/share/zoneinfo | mysql -uroot -pPassword mysql
Modify the TimeZone configuration for Apache
#nano /etc/php/7.0/apache2/php.ini
[Date]
; Defines the default timezone used by the date functions
; http://php.net/date.timezone
date.timezone = “Asia/Bangkok”
แก้ timezone#pico /etc/php/7.0/cli/php.ini"Asia/Bangkok"

8.Restart Apache Service
#systemctl start apache2.service
#Visit the Web Page to Finish the Upgrade
แก้ในขั้นตอนการอัพเกรด
innodb_flush_log_at_timeout =3
innodb_read_io_threads =32
innodb_write_io_threads =16
innodb_buffer_pool_instances =9
innodb_io_capacity 200 =5000
innodb_io_capacity_max =10000

เว็บอ้างอิง https://www.chenyiting.com/2018/04/04/upgrade-cacti-0-8-8-to-1-1-37/

การติดตั้ง Cacti Monitoring ใน Ubuntu 16.04


1. ติดตั้ง Ubuntu Server 16.04
2. หลังจากติดตั้งแล้ว อัพเดตระบบอีกครั้งด้วยคำสั่ง
# apt-get update
# apt-get upgrade

3. ติดตั้ง apache2
#sudo apt-get install apache2
#sudo systemctl status apache2.service
#sudo netstat -tlpn
#sudo a2enmod ssl
#service apache2 restart
#sudo a2ensite default-ssl.conf
#service apache2 reload
#sudo systemctl restart apache2.service
#sudo netstat -tlpn
เรียกใช้งาน apache2 https://10.10.2.229/

4. ติดตั้ง php7
#apt install php7.0-snmp php7.0-xml php7.0-mbstring php7.0-json php7.0-gd php7.0-gmp php7.0-zip php7.0-ldap php7.0-mcrypt
#sudo apt install php7.0 libapache2-mod-php7.0 php7.0-mysql php7.0-xml php7.0-gd

ทดสอบสร้างไฟล์ใน info.php
#sudo nano /var/www/html/info.php
<?php
phpinfo();
?>
เรียกใช้งาน https://your_server_IP_address/info.php

5. ติดตั้ง MySQL
Step 1 – Configure Apt Repository
#add-apt-repository 'deb http://archive.ubuntu.com/ubuntu trusty universe'
#apt-get update
#wget http://repo.mysql.com/mysql-apt-config_0.8.9-1_all.deb
#sudo dpkg -i mysql-apt-config_0.8.9-1_all.deb

Step 2 – Install MySQL Server
#sudo apt-get update
#sudo apt-get install mysql-server
# apt-get install apache2 mysql-server-5.6 php libapache2-mod-php

Step 3 – Secure MySQL Installation
#sudo mysql_secure_installation
#sudo systemctl restart mysql.service

#mysql -u root -p

6. ติดตั้ง phpMyAdmin
#sudo apt install php-gettext phpmyadmin
เรียกใช้งาน https://your_server_IP_address/phpmyadmin/

7. ติดตั้ง SNMP, SNPMD และ RRDTools
# apt-get install snmp snmpd rrdtool

8. การติดตั้ง Cacti
# apt-get install cacti cacti-spine
ทำตามขั้นตอน
- เลือก server เป็น apache2
- เลือก config database Yes
- ใส่รหัสผ่าน MySQL
- ตั้งชื่อ Database for Cacti ว่า cacti

# service snmpd restart
# service mysql restart
# service apache2 restart

9. เข้าเว็บหน้า config cacti  http://your-server_ip-address/cacti
Default user & password คือ admin

เว็บอ้างอิง https://linoxide.com/ubuntu-how-to/install-setup-cacti-ubuntu-16-04/

วันอังคารที่ 11 ธันวาคม พ.ศ. 2561

การ Upgrade โปรแกรม Monitoring Observium บน Ubuntu 16.04


Community Edition
Upgrade to latest Major release

0.Disable observium cronjobs [optional]

1.Run the following commands (as root):

#cd /opt
#mv observium observium_old
#wget -Oobservium-community-latest.tar.gz http://www.observium.org/observium-community-latest.tar.gz
#tar zxvf observium-community-latest.tar.gz
#mv /opt/observium_old/rrd observium/
#mv /opt/observium_old/logs observium/
#mv /opt/observium_old/config.php observium/

2.Update DB schema:
#/opt/observium/discovery.php -u

3.If it has been a very long time since you've updated (12 months or more), you may want to force an immediate rediscovery of all devices to make sure things are up to date :
#/opt/observium/discovery.php -h all

0.Re-enable observium cronjobs [optional]

4.You may now delete your observium_old directory if everything has updated correctly:
#rm -rf observium_old

5.Reboot Server

web referrence : https://docs.observium.org/install_debian/


วันศุกร์ที่ 9 พฤศจิกายน พ.ศ. 2561

การเปิด Sharing SMB1 ใน Windows 10 10 Build 1803 เพื่อให้มองเห็นไฟล์แชร์จาก OS เวอร์ชั่นเก่า

1. ค้นหาคำว่า ‘Turn Windows features on or off’ ในเมนู Search 
2. ติ๊กที่ช่อง  ‘SMB1.0/CIFS File Sharing Support’ 
3. Restart เครื่อง 1 ครั้ง

วันพุธที่ 29 สิงหาคม พ.ศ. 2561

ติดตั้ง NTP Server CentOS

ntp : ntpd server which continuously adjusts system time and utilities used to query and configure the ntpd daemon.
ntpdate : Utility to set the date and time via NTP.
ntp-doc : NTP documentation

Setup NTPD on CentOS Linux
# yum install ntp ntpdate ntp-doc

Turn on service, enter:
# chkconfig ntpd on

Synchronize the system clock with 0.pool.ntp.org server (use this command only once or as required):
# ntpdate pool.ntp.org

Start the NTP server. The following will continuously adjusts system time from upstream NTP server. No need to run ntpdate:
# /etc/init.d/ntpd start

web reference : https://www.cyberciti.biz/faq/howto-install-ntp-to-synchronize-server-clock/

วันศุกร์ที่ 17 สิงหาคม พ.ศ. 2561

แก้ปัญหา VeeamONE ไม่สามารถเชื่อมต่อ vCenter ได้ เนื่องจากติดปัญหา Time Difference

1.open Registry Editor and navigate to this key:
HKEY_LOCAL_MACHINE\SOFTWARE\Veeam\Veeam ONE Monitor\Service

2.Create a new DWORD value with the following parameters:
Value name = MaxTimeDiff
Value data (in DECIMAL format) = 43200

This will set maximum time difference timeout to 12 hours. According to your first post, that would be more than enough.

3.Restart Veeam ONE Monitor Server service and try to add a vCenter Server into Veeam ONE configuration one again.

Web Reference : https://www.veeam.com/kb1677

วันจันทร์ที่ 13 สิงหาคม พ.ศ. 2561

วิธีแก้ วีธีลบ ไวรัส มัลแวร์ ที่ซ่อนไฟล์ข้อมูลใน USB Flash Drive

1. เข้า cmd
2. เปลี่ยนเป็น Drive ของ Flash Drive
3. พิมพ์ attrib *.* -s -h -a -r /d /s
ตัวอย่าง :  G:/>attrib *.* -s -h -a -r /d /s