การสร้าง bash file ใน Freebsd
1. เข้าไปที่ path ที่จะสร้างไฟล์
#cd /var/log
2. สร้างไฟล์ชื่อ Clearlog.sh
#pico Clearlog.sh
3. เริ่มเขียนรูปแบบของ script sh
#!/bin/sh
cd /var/log
rm httpd-access.log
touch httpd-access.log
chown root:wheel httpd-access.log
rm httpd-error.log
touch httpd-error.log
chown root:wheel httpd-error.log
rm snmpd.log
touch snmpd.log
chown root:wheel snmpd.log
sleep 10s --> ตั้งค่าหน่วงเวลา
/usr/local/sbin/apachectl restart
เสร็จแล้ว save ออกมา
4. เปลี่ยน mod ของไฟล์
#chmod 755 Clearlog.sh
5. ทดสอบการรันไฟล์
#./Clearlog.sh
หากไม่มี Error อะไรแสดงว่า Script ใช้ได้
6.เข้าไปกำหนดค่าเวลาที่ crontab -e
เพิ่มข้อความ
0 5 * * 0 /var/log/Clearlog.sh
เสร็จแล้ว save ออกมา
วันพุธที่ 24 ธันวาคม พ.ศ. 2557
วันศุกร์ที่ 12 ธันวาคม พ.ศ. 2557
แก้ปัญหา Apache ฟ้อง AH00558 ใน Ubuntu 14.04
แก้ปัญหา Apache ฟ้อง AH00558 ใน Ubuntu 14.04
- Restarting web server apache2
AH00558: apache2: Could not reliably determine the server's fully qualified domain name, using 127.0.1.1.
Set the 'ServerName' directive globally to suppress this message
เข้าไปที่ #/etc/apache2
#pico apache2.conf
#pico apache2.conf
เพิ่มข้อความ
ServerName localhost
ServerName localhost
กด Ctrl+x พร้อม save ไฟล์
สั่ง restart apache ใหม่
sudo service apache2 restart
sudo service apache2 restart
วันพฤหัสบดีที่ 16 ตุลาคม พ.ศ. 2557
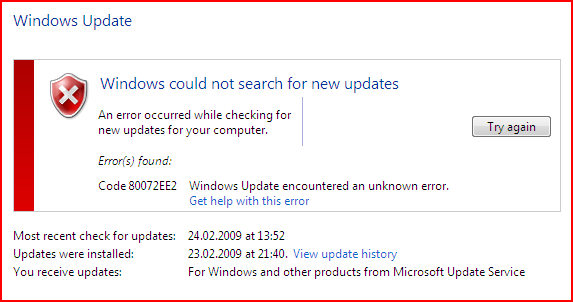
แก้ปัญหา Update Windows แล้วขึ้น Error 80072EE2
วิธีที่ 1
ให้ Allow ใน Firewall เว็บต่อไปนี้
http://*.update.microsoft.com
https://*.update.microsoft.com
http://download.windowsupdate.com
วิธีที่ 2
Remove การ์ดแลน แล้ว Add ใหม่
วันพฤหัสบดีที่ 25 กันยายน พ.ศ. 2557
วิธี Import MySQL Dumpfile, SQL Datafile Into My Database ( กรณี Database มีขนาดใหญ่ )
How can I import a MySQL dumpfile into my database? I'm using CentOS Linux 5 server. My old hosting provider gave me a data.sql file and I do have access to my Unix / Linux server via ssh. So How do I restore my data using command line over the ssh session?
You can easily restore or import MySQL data with the mysql command itself. First you need to login to your system using ssh or putty client.
Step #1: Upload File To MySQL Server
You can upload data.sql file using the sftp or scp command, enter:
The data.sql file will be uploaded to /home/vivek directory. Avoid using /tmp or Apache document directory such as /var/www/html as anyone can see your data on the remote server.
$ scp data.sql vivek@example.cyberciti.biz:/home/vivekThe data.sql file will be uploaded to /home/vivek directory. Avoid using /tmp or Apache document directory such as /var/www/html as anyone can see your data on the remote server.
Step #2: Login To Remote Server
Type the following command at the shell prompt:
Replace example.cyberciti.biz with actual server name or an IP address.
$ ssh loginname@example.cyberciti.bizReplace example.cyberciti.biz with actual server name or an IP address.
Step#3: Import Datafile
Type the following command to import sql data file:
In this example, import 'data.sql' file into 'blog' database using vivek as username:
$ mysql -u username -p -h localhost DATA-BASE-NAME < data.sqlIn this example, import 'data.sql' file into 'blog' database using vivek as username:
$ mysql -u vivek -p -h localhost blog < data.sql
If you have a dedicated database server, replace localhost hostname with with actual server name or IP address as follows:
OR use hostname such as mysql.cyberciti.biz
$ mysql -u username -p -h 202.54.1.10 databasename < data.sqlOR use hostname such as mysql.cyberciti.biz
$ mysql -u username -p -h mysql.cyberciti.biz database-name < data.sql
If you do not know the database name or database name is included in sql dump you can try out something as follows:
$ mysql -u username -p -h 202.54.1.10 < data.sqlอ้างอิง : http://www.cyberciti.biz/faq/import-mysql-dumpfile-sql-datafile-into-my-database/
วันพฤหัสบดีที่ 7 สิงหาคม พ.ศ. 2557
แก้ปัญหา mcrypt extension is missing หลังจากติดตั้ง phpmyadmin ใน Ubuntu 13.10 Server
1. ติดตั้ง php5-mcrypt และ restart apache
sudo apt-get install php5-mcrypt
sudo service apache2 restart
2. แก้ไขพาธที่ตั้ง และ restart apache อีกครั้ง
cd /etc/php5/apache2/conf.d
sudo ln -s ../../conf.d/mcrypt.ini 30-mcrypt.ini
sudo service apache2 restart
อ้างอิง: http://babilonline.blogspot.com/2013/10/ubuntu-1310-phpmyadmin-mcrypt-extension.html
วันศุกร์ที่ 18 กรกฎาคม พ.ศ. 2557
Set IP Port Manage IBM3650 M3
Set IP Port Manage IBM3650 M3
เปิดเครื่อง
- กด F1
- Setup Utility > System Setting
- Next > Management Module
-Next> Network Configuration
- Find The IP Address and Write it .
IBM System x ทุกเครื่อง
IP Default: 192.168.70.125
Subnet mask:255.255.255.0
User:USERID
Password:PASSW0RD
วันอาทิตย์ที่ 29 มิถุนายน พ.ศ. 2557
การติดตั้ง APACHE , MYSQL , PHP and WEBMIN บนระบบปฏิบัติการ freeBSD10
1. ติดตั้ง freebsd พร้อมตั้งค่าต่างๆให้เรียบร้อย
2. เข้า root mode
3. ใช้คำสั่ง portsnap fetch
#portsnap fetch
รอจนเสร็จ แล้วใช้คำสั่ง extract แตกไฟล์
#portsnap extract
หรือใช้คำสั่ง portsnap fetch && portsnap extract ทำในคราวเดียวกันเลยก็ได้
วันพฤหัสบดีที่ 26 มิถุนายน พ.ศ. 2557
การติดตั้ง KDE Desktop ใน Freebsd 10
การติดตั้ง KDE Desktop ใน Freebsd 10
1. ติดตั้ง Freebsd 10 พร้อมตั้งค่าต่างๆให้เรียบร้อย
2. ก่อนติดตั้งให้ reboot เครื่อง 1 ครั้ง หลังจากนั้น login เป็น root
3. ใช้คำสั่ง pkg ในการดู packege ทั้งหมดที่ต้องการ
# pkg
1. ติดตั้ง Freebsd 10 พร้อมตั้งค่าต่างๆให้เรียบร้อย
2. ก่อนติดตั้งให้ reboot เครื่อง 1 ครั้ง หลังจากนั้น login เป็น root
3. ใช้คำสั่ง pkg ในการดู packege ทั้งหมดที่ต้องการ
# pkg
วันพุธที่ 25 มิถุนายน พ.ศ. 2557
คำสั่งที่ใช้บ่อยใน FreeBSD/UNIX
hostname           Name of computer
uname -a           Shows operating system info
env                Shows current environment variables, including user & path
df -h              D_isk F_ree space
uptime             Server UpTime stats & operation
วันพฤหัสบดีที่ 5 มิถุนายน พ.ศ. 2557
ขั้นตอนการติดตั้ง VMware vCenter Operations Manager
Downloading vCenter Operations Manager
I already had vSphere 5 and vCenter 5 deployed in my vSphere lab. To evaluate vCOPS, all I had to do was see the vCOPS product evaluation center to download it and obtain license keys.
Figure 1: vCOPS Evaluation Center
Once you register for your free account and login, in the eval center, you’ll find your 60 day evaluation keys for vCOPS, vCenter Infrastructure Navigator, and vCenter Chargeback. You’ll also find downloads for each of those products. Note that if you want to evaluate vCenter Configuration Manager, you’ll have to click to contact a sales rep.
วันจันทร์ที่ 19 พฤษภาคม พ.ศ. 2557
วันจันทร์ที่ 21 เมษายน พ.ศ. 2557
แก้ปัญหา vsphere HA Error : The number of heartbeat datastores for host is 1, which is less than required: 2
HA Error: The number of heartbeat datastores for host is 1, which is less than required: 2 (2004739)
Symptoms แถบที่ summary สีเหลืองฟ้อง
- The datastore is not accessible by all hosts.
- The number of shared datastores between all hosts is less than 2.
- While implementing a vSphere High Availability (HA) configuration, you see this error on one of the ESXi 5.x hosts:
The number of heartbeat datastores for host is 1, which is less than required: 2
The number of heartbeat datastores for host is 0, which is less than required: 2
Cause
วันพุธที่ 9 เมษายน พ.ศ. 2557
วิธีเปลี่ยนชื่อ Slot Name บน Dell Blade
1 Log in to the CMC Web interface.
2 Select Server Overview in the Chassis menu in the system tree.
3 Click Setup - Slot Names. The Slot Names page displays.
4 Type the updated or new name for a slot in the Slot Name field. Repeat
this action for each slot you want to rename.
5 Click Apply.
วันพฤหัสบดีที่ 27 มีนาคม พ.ศ. 2557
การติดตั้ง ZENTYAL Server 3.3 บน Ubuntu 12
1. ติดตั้ง Ubuntu Server 12.04 พร้อม Config ค่าต่างๆให้เรียบร้อย
2. เพิ่ม Source List ของ zentyal เข้าไป โดยเใช้คำสั่ง nano หรือ pico เข้าไป
$: sudo nano /etc/apt/sources.list
วันพุธที่ 22 มกราคม พ.ศ. 2557
Install kde on freebsd 9.2
install kde on freebsd 9.2
#pkg_add -r xorg
#pkg_add -r kde4
เข้าไปเพิ่มค่าในไฟล์ fstab
#ee /etc/fstab
proc /proc procfs rw 0 0
กด esc --> กด a --> กด a
save change
เข้าไปเพิ่มค่าในไฟล์ rc.conf
#ee /etc/rc.conf'
เพิ่มใต้ sshd_enable="YES"
hald_enable="YES"
dbus_enable="YES"
kde4_enable="YES"
kdm4_enable="YES"
กด esc --> กด a --> กด a
save change
reboot
วันอังคารที่ 21 มกราคม พ.ศ. 2557
Install KDE in FreeBSD 9.x
Some people like to play with FreeBSD and to use it like a desktop operating system. Normally, FreeBSD is a text mode server OS with full packages.
How do you install a desktop environment like KDE and GNOME on FreeBSD? In my example, I will explain how I have installed KDE 4.8.4 on FreeBSD 9.1.
First, login to FreeBSD under root and run sysinstall > Pre-packaged Software > Install from FTP server > X11 > KDE and Xorg:
root@FreeBSD-Unixmen:/root # sysinstall
The setup will take some time to download and install the packages and dependencies required.
Now add some extra line to /etc/rc.conf to avoid freezing keyboard and mouse:
dbus_enable="YES"
hald_enable="YES"
kdm4_enable="YES"
local_startup="${local_startup} /usr/local/kde4/etc/rc.d"
dbus_enable=”YES”
hald_enable=”YES
Please reboot, login and enjoy!
วันพุธที่ 15 มกราคม พ.ศ. 2557
คำสั่ง Command ในการ Update / Install Packages สำหรับ CentOS
Task: Display list of updated software (security fix)
Type the following command at shell prompt:
# yum list updates
# yum list updatesTask: Patch up system by applying all updates
To download and install all updates type the following command:
# yum update
# yum updateTask: List all installed packages
List all installed packages, enter:
# rpm -qa
# yum list installed
Find out if httpd package installed or not, enter:
# rpm -qa | grep httpd*
# yum list installed httpd
# rpm -qa
# yum list installedFind out if httpd package installed or not, enter:
# rpm -qa | grep httpd*
# yum list installed httpdTask: Check for and update specified packages
# yum update {package-name-1}
To check for and update httpd package, enter:
# yum update httpd
# yum update {package-name-1}To check for and update httpd package, enter:
# yum update httpdTask: Search for packages by name
Search httpd and all matching perl packages, enter:
# yum list {package-name}
# yum list {regex}
# yum list httpd
# yum list perl*
Sample output:
Loading "installonlyn" plugin
Loading "security" plugin
Setting up repositories
Reading repository metadata in from local files
Installed Packages
perl.i386                                4:5.8.8-10.el5_0.2     installed
perl-Archive-Tar.noarch                  1.30-1.fc6             installed
perl-BSD-Resource.i386                   1.28-1.fc6.1           installed
perl-Compress-Zlib.i386                  1.42-1.fc6             installed
perl-DBD-MySQL.i386                      3.0007-1.fc6           installed
perl-DBI.i386                            1.52-1.fc6             installed
perl-Digest-HMAC.noarch                  1.01-15                installed
perl-Digest-SHA1.i386                    2.11-1.2.1             installed
perl-HTML-Parser.i386                    3.55-1.fc6             installed
.....
.......
..
perl-libxml-perl.noarch                  0.08-1.2.1             base
perl-suidperl.i386                       4:5.8.8-10.el5_0.2     updates
# yum list {package-name}
# yum list {regex}
# yum list httpd
# yum list perl*Sample output:
Task: Install the specified packages [ RPM(s) ]
Install package called httpd:
# yum install {package-name-1} {package-name-2}
# yum install httpd
# yum install {package-name-1} {package-name-2}
# yum install httpdTask: Remove / Uninstall the specified packages [ RPM(s) ]
Remove package called httpd, enter:
# yum remove {package-name-1} {package-name-2}
# yum remove httpd
# yum remove {package-name-1} {package-name-2}
# yum remove httpdTask: Display the list of available packages
# yum list all
# yum list allTask: Display list of group software
Type the following command:
# yum grouplist
Output:
Installed Groups:
   Engineering and Scientific
   MySQL Database
   Editors
   System Tools
   Text-based Internet
   Legacy Network Server
   DNS Name Server
   Dialup Networking Support
   FTP Server
   Network Servers
   Legacy Software Development
   Legacy Software Support
   Development Libraries
   Graphics
   Web Server
   Ruby
   Printing Support
   Mail Server
   Server Configuration Tools
   PostgreSQL Database
Available Groups:
   Office/Productivity
   Administration Tools
   Beagle
   Development Tools
   GNOME Software Development
   X Software Development
   Virtualization
   GNOME Desktop Environment
   Authoring and Publishing
   Mono
   Games and Entertainment
   XFCE-4.4
   Tomboy
   Java
   Java Development
   Emacs
   X Window System
   Windows File Server
   KDE Software Development
   KDE (K Desktop Environment)
   Horde
   Sound and Video
   FreeNX and NX
   News Server
   Yum Utilities
   Graphical Internet
Done
# yum grouplistOutput:
Task: Install all the default packages by group
Install all 'Development Tools' group packages, enter:
# yum groupinstall "Development Tools"
# yum groupinstall "Development Tools"Task: Update all the default packages by group
Update all 'Development Tools' group packages, enter:
# yum groupupdate "Development Tools"
# yum groupupdate "Development Tools"Task: Remove all packages in a group
Remove all 'Development Tools' group packages, enter:
# yum groupremove "Development Tools"
# yum groupremove "Development Tools"Task: Install particular architecture package
If you are using 64 bit RHEL version it is possible to install 32 packages:
# yum install {package-name}.{architecture}
# yum install mysql.i386
# yum install {package-name}.{architecture}
# yum install mysql.i386Task: Display packages not installed via official RHN subscribed repos
Show all packages not available via subscribed channels or repositories i.e show packages installed via other repos:
# yum list extras
Sample output:
Loading "installonlyn" plugin
Loading "security" plugin
Setting up repositories
Reading repository metadata in from local files
Extra Packages
DenyHosts.noarch                         2.6-python2.4          installed
VMwareTools.i386                         6532-44356             installed
john.i386                                1.7.0.2-3.el5.rf       installed
kernel.i686                              2.6.18-8.1.15.el5      installed
kernel-devel.i686                        2.6.18-8.1.15.el5      installed
lighttpd.i386                            1.4.18-1.el5.rf        installed
lighttpd-fastcgi.i386                    1.4.18-1.el5.rf        installed
psad.i386                                2.1-1                  installed
rssh.i386                                2.3.2-1.2.el5.rf       installed
# yum list extrasSample output:
Task: Display what package provides the file
You can easily find out what RPM package provides the file. For example find out what provides the /etc/passwd file:
# yum whatprovides /etc/passwd
Sample output:
Loading "installonlyn" plugin
Loading "security" plugin
Setting up repositories
Reading repository metadata in from local files
setup.noarch                             2.5.58-1.el5           base
Matched from:
/etc/passwd
setup.noarch                             2.5.58-1.el5           installed
Matched from:
/etc/passwd
You can use same command to list packages that satisfy dependencies:
# yum whatprovides {dependency-1} {dependency-2}
Refer yum command man page for more information:
# man yum
# yum whatprovides /etc/passwdSample output:
# yum whatprovides {dependency-1} {dependency-2}Refer yum command man page for more information:
# man yumอ้างอิง : http://www.cyberciti.biz/faq/rhel-centos-fedora-linux-yum-command-howto/
วันศุกร์ที่ 10 มกราคม พ.ศ. 2557
Reset forgot Password on Windows Server 2008 R2
การ Reset Password บน Windows Server 2008 R2 แบบ Workgroup
ใส่แผ่น Boot Windows เข้าไป แล้ว Restart ให้ระบบเริ่มบูตจากแผ่น Windows
สมัครสมาชิก:
ความคิดเห็น (Atom)


